
Overview
EventPrime’s Bookings section lets you view and manage all attendee Bookings from your WordPress dashboard. You can filter Bookings by Event, payment method, status, or date, and take actions like exporting or updating records—all in one place.
Steps to Manage Bookings in EventPrime
1. Make sure Bookings are enabled for your Events. If you’re unsure how to enable Bookings, refer to this article: How to Turn On Bookings for a WordPress Event
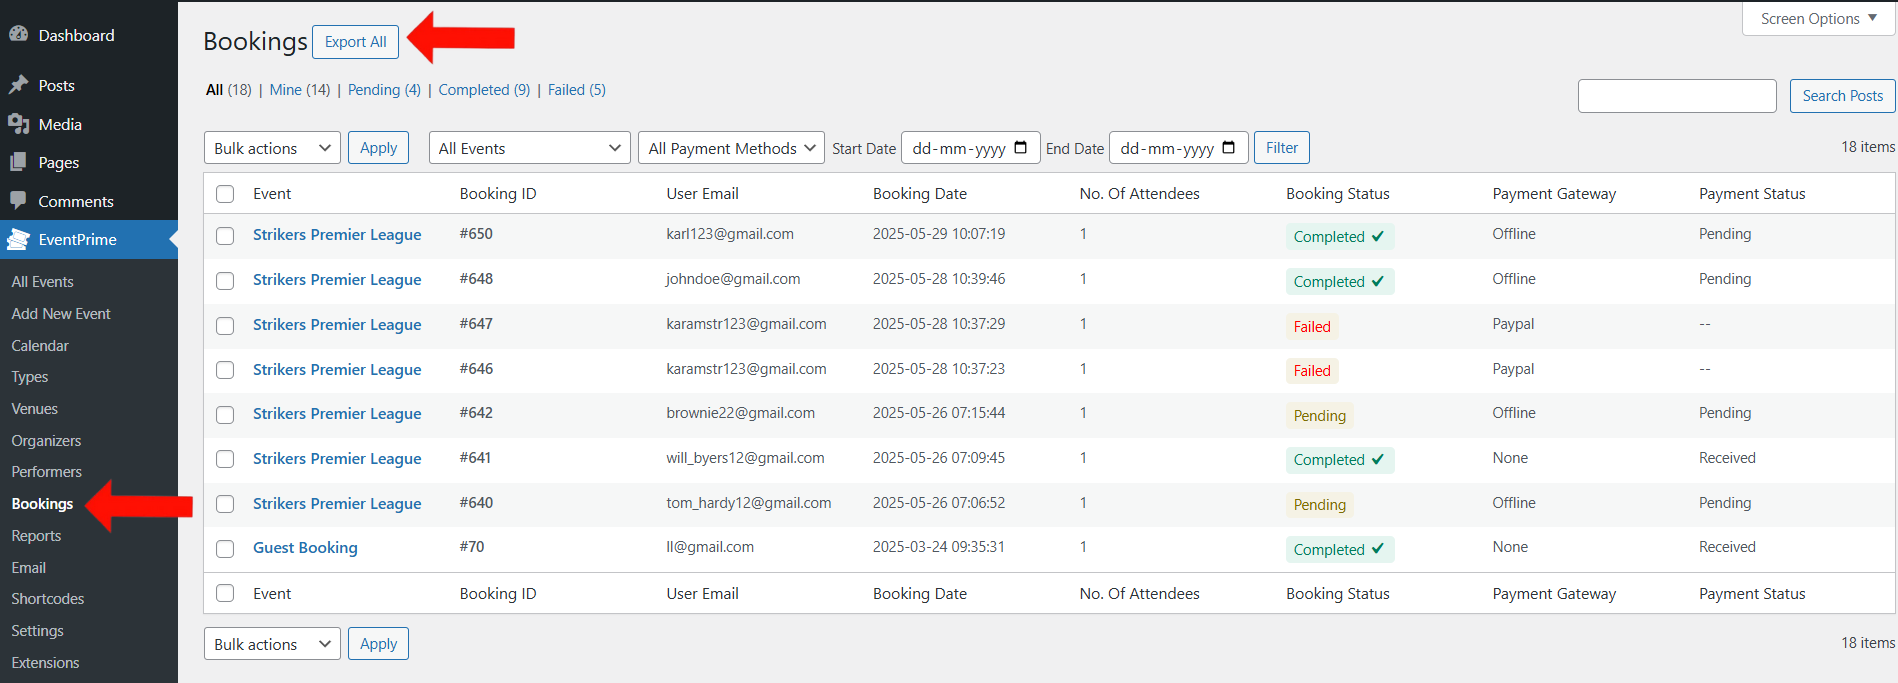
2. To manage Bookings, navigate to the EventPrime menu and select the Bookings submenu. Here, you’ll see a complete list of all Bookings made across your Events, including details such as:
- Event Name – Shows the Event for which the booking was made.
- Booking ID – A unique identifier assigned to each Booking.
- User Email – Displays the email address of the attendee.
- Booking Date – The date on which the Booking was completed.
- Number of Attendees – Indicates how many people were included in the Booking.
- Booking Status – Displays the current status of the Booking (e.g., Completed, Pending, Failed).
- Payment Gateway – Shows the method of payment used (e.g., PayPal, Offline, None).
- Payment Status – Indicates whether the payment was received or is still pending.
You can use Filter Options such as:
- Event Filter – View Bookings for a specific Event.
- Payment Method Filter – Filter Bookings based on how payment was made (PayPal, Offline, etc.).
- Date Filter – Set a Start Date and End Date to view Bookings made in a specific time range.
- Booking Status Filter – Sort Bookings by status like All, Completed, Pending, Failed, Draft, Refunded, or Mine.
- Bulk Actions – Select multiple Bookings to delete or export at once using the dropdown.
- Export All – Click this button to download a CSV file containing all Bookings records for offline use or reporting.
Conclusion
EventPrime makes it easy to manage all your Event Bookings from one place. You can track attendee details, filter Bookings by different criteria, and export Booking data when needed. It helps you stay organized and keeps your Booking process smooth and manageable.
Questions, Support & Custom Solutions
- Need more details or can't find what you're looking for? Let us know how we can help! Contact our support team here.
- Looking for a tailor-made solution to meet your specific needs? Our dedicated customization team is here to help! Use this link to share your requirements with us, and we'll collaborate with you to bring your vision to life.
HOW DO I SET UP STRIPE PAYMENT?
Hello,
Thank you for using EventPrime!
We are pleased to inform you that you can utilize our “Stripe Payments” extension which can be seamlessly integrated with our plugin.
Simply acquire your secret and publishable keys from Stripe by visiting this URL, and include these keys in the settings of the Stripe extension.
I hope this helps!
What’s the difference between Booking and the WooCommerce Integration?
Hello,
Thank you for reaching out to us!
We would like to inform you that our plugin offers two options pertaining to the booking functionality you can either choose to create tickets natively or opt for third-party bookings where the visitors will be redirected to the provided URL.
When the “WooCommerce Integration” extension is installed and activated, you are empowered with extra capabilities to add optional and/ or mandatory products to your events which will be exhibited during the checkout process.
For more details please visit this URL – https://theeventprime.com/all-extensions/woocommerce-integration/
If you require further clarification or additional information, please feel free to contact us.
Where is the documentation for the checkout fields?
Thank you for reaching out!
We are in the process of creating comprehensive documentation specifically for checkout fields, which will be made available soon. In the interim, you can refer to our Starter Guide where you’ll find relevant information under the fifth point (Checkout Fields) within the section titled “Creating A New Event” and some additional details under the “Settings” section.
If you have any further questions or need assistance, feel free to contact us.
We are here to ensure that your experience with EventPrime is smooth and well-informed.
Hello is it possible to transfer bookings from one event to another? If yes can it be done multiple bookings to be transferred over?
You can enable user Cancellations by navigating to the EventPrime->settings in your WordPress dashboard. On the Edit Event page, locate the ‘Tickets’ section in the Event Settings metabox. Check the checkbox labeled ‘Allow users to cancel confirmed bookings for this event’ to enable cancellation options for users. Once the booking has been canceled, users can rebook the new event.
If this does not resolve your issue, please feel free to contact our support team for further assistance. We are always happy to help. You can reach us through our official support link: https://theeventprime.com/support/.
Hi! How is it possible to change the behaviour of new bookins? I mean, than when a new person finish their purschase, the booking doesn’t change to “Completed” and remains as “Confirmation Pending”. For free events this is very usefull to manage the capacity because we may need not every kind of people to assist to some events for personal (organizer) reassons.
Another question/suggestion, would be possible to add the Spanish “Bizum” method of payment? Would be nice because is an extended, free for users and easy to use as payment method.
Thank you for your very good job! Planning to use your plugin for first time for the next event and if we found easy to manage we will plan to move to payd subscription.
Thank you for your interest in our plugin!
To keep new bookings in “Pending” status, you can configure this in the backend when using offline payment methods. This ensures better control over event capacity.
For more information please visit the following link: https://theeventprime.com/all-extensions/offline-payments/
We currently do not support the Bizum payment gateway. However, you can enable this functionality by using our WooCommerce checkout extensions. Our WooCommerce checkout extension redirects to the WooCommerce checkout page, where WooCommerce provides the facility of the different payment gateway.
Hi, I’m trying to use the Attendee Check-In extension, which I didn’t see any dedicated documentation for. I can’t find how to get the check-in QR code or the check-in screen for admins to look at, I can only find how to directly modify the check-in status in the Bookings List.
Thanks for reaching out to us.
With the Event Tickets Extension, attendees will receive a ticket containing a unique QR code as part of the booking confirmation email. This QR code links directly to the booking details page and can be scanned with any QR code application on iOS or Android devices for real-time verification.
For more information about Event ticket extension please visit this link:
https://theeventprime.com/all-extensions/event-tickets/
If the issue persists, please let us know, and we will be happy to assist you further.