
Overview
The Live Seating extension in EventPrime lets you create visual seat maps for Events where users can select specific seats during booking. Ideal for concerts, conferences, and theaters, this feature helps display a structured layout with rows, columns, aisles, and reserved sections.
Prerequisite
Please ensure that EventPrime and the Live Seating extension are installed and activated.
If the extension is not installed, you can get it here: Get Your Live Seating Extension
Steps to Set Up and Use the Live Seating Extension for Your Events in EventPrime
1. Access the Live Seating Settings in EventPrime
- Navigate to EventPrime menu, and select Settings submenu.
- Go to the Extensions tab. and click the Manage button for Live Seating.
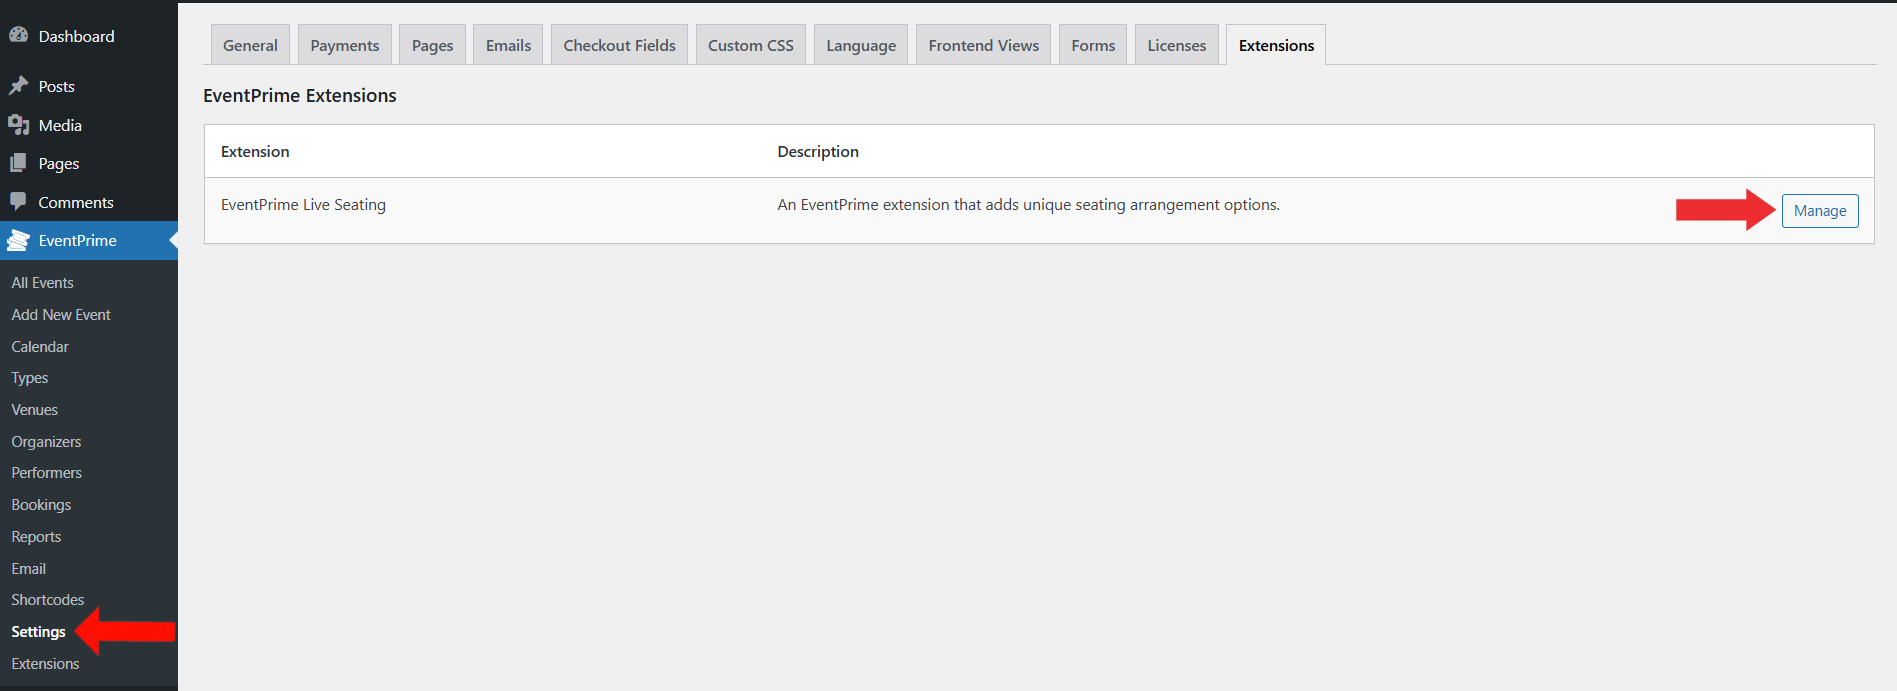
2. Choose Default Seat Icons, Colors, and Labels to Visually Organize your Layout
On the Live Seating Settings page, you can decide how each type of seat will look during booking.
- Upload a seat icon that will show in your seating layout.
- Pick colors and labels for different seat types—Available, Selected, Booked, and Reserved—so users can easily tell them apart.
- Click Save Changes to apply your settings.
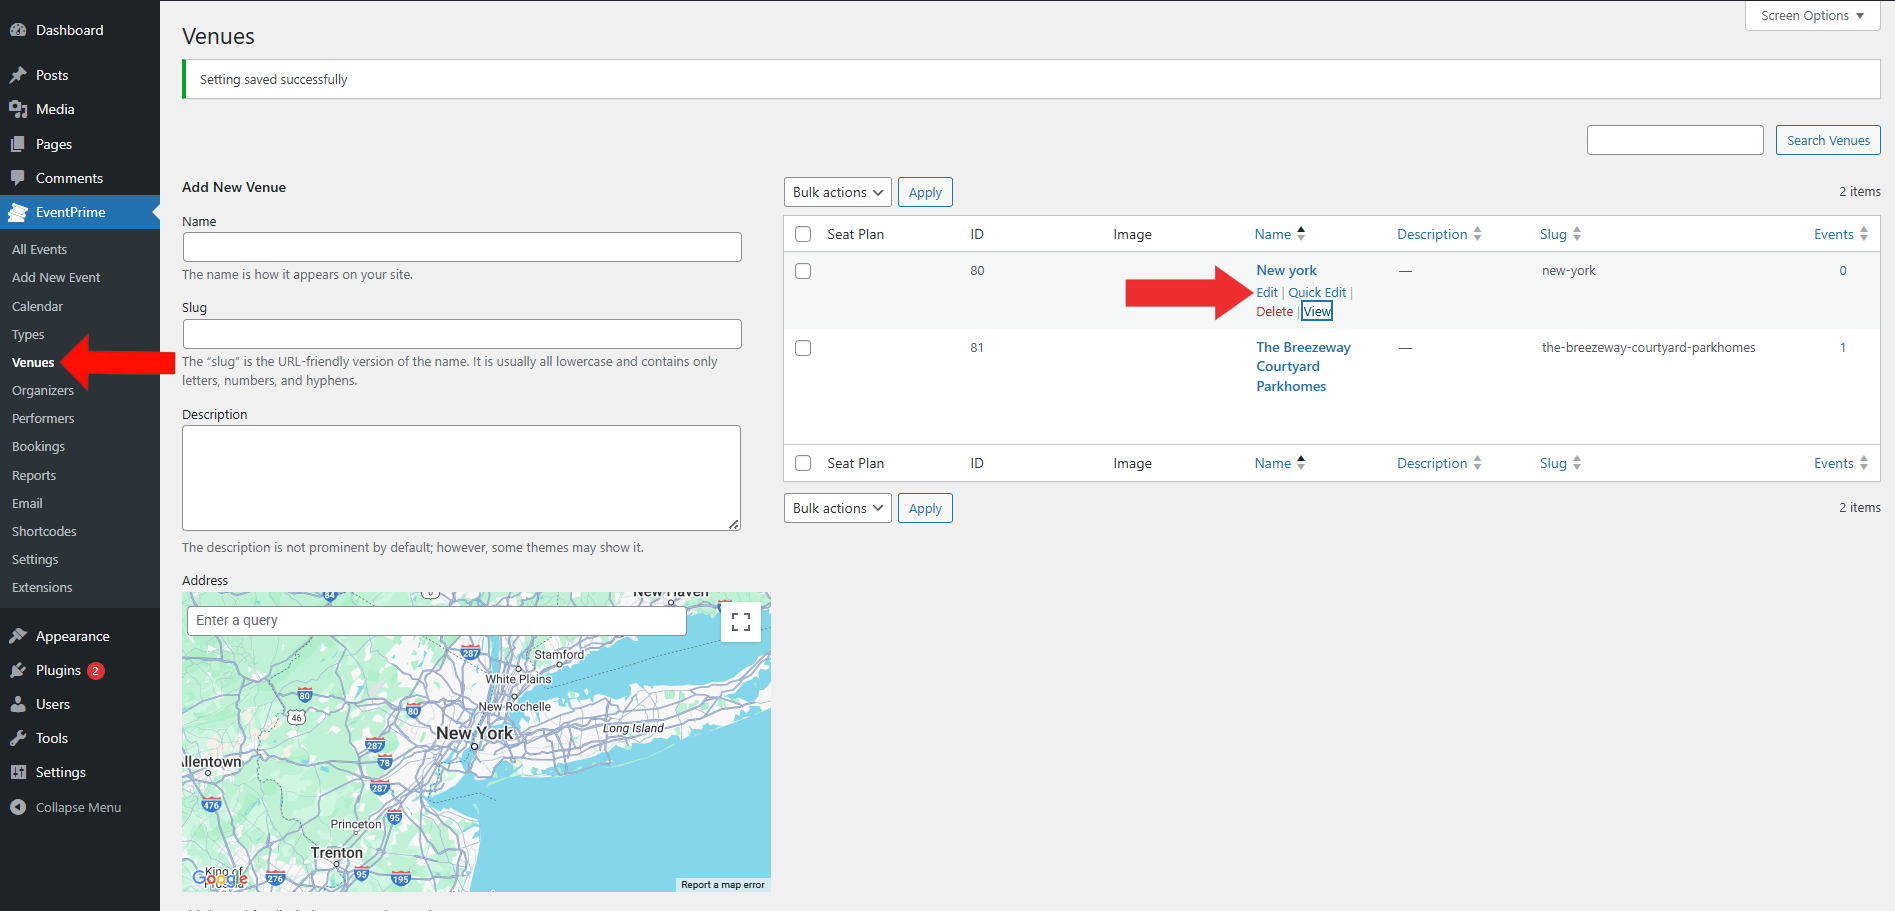
3. Go to the Venues Section to Create a New Venue or Edit an Existing One for your Event
Venues define where your Events take place. You’ll need to set this before adding seating plans.
- Navigate to the EventPrime menu and select the Venues submenu.
- Here, you can either click Add New to create a new Venue or click Edit to modify existing one.
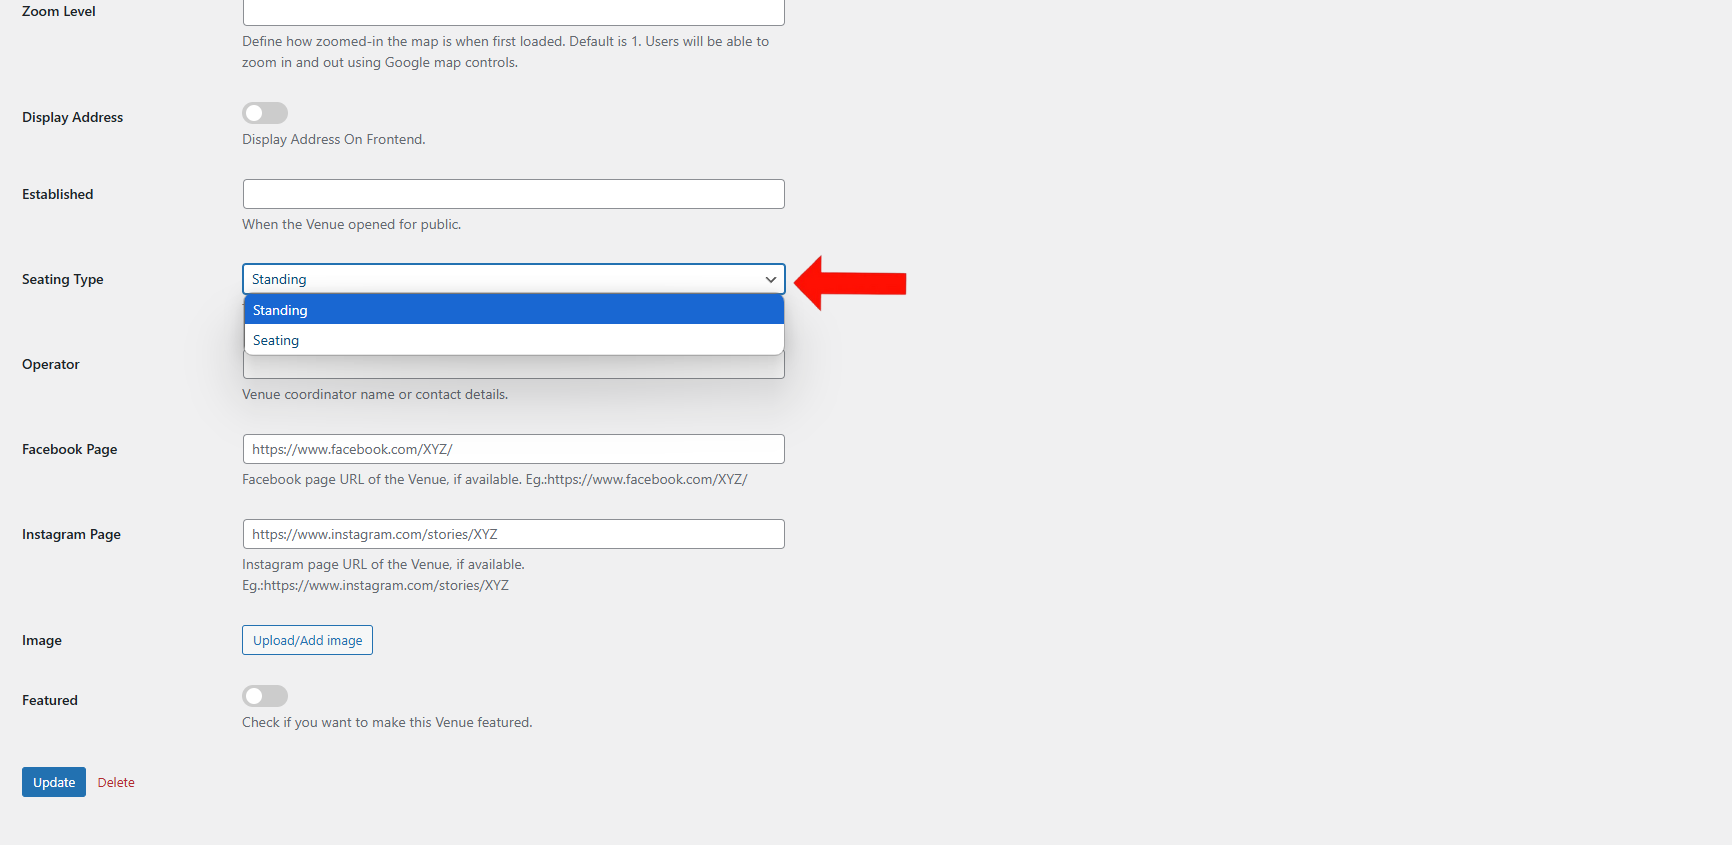
4. Choose ‘Seating’ as the Seating Type and Enter Venue Details
On the Edit Venue page, scroll down to the Seating Type field and select Seating to enable seating layout options for this Venue. While you’re here, you can also add basic details like:
- Name: The name of the Venue, as shown on the site.
- Slug: A URL-friendly version of the Venue name (auto-generated or customized).
- Description: Optional—used by some themes to describe the Venue.
- Address: This will be used to place a marker on the Event map.
- Latitude/Longitude: Coordinates for map positioning.
- Locality, State, Country, Postal Code: Location details for the Venue.
- Zoom Level: Controls the default zoom level of the map (default is 1).
- Display Address: Option to show or hide the address on the frontend.
- Established: Year or date when the Venue started operating.
- Operator: Contact info or name of the Venue coordinator.
- Facebook / Instagram Page: Optional links for social media pages.
- Image: Upload a Venue image.
- Featured: Check this to highlight the Venue as featured.
Click Update to save your Venue and apply the Seating layout setting.
5. Open the Seating Layout Builder for the Selected Venue
- Navigate to the EventPrime menu and select the Venues submenu.
- From the list of existing Venues, find the one where you want to create a seating layout. Click on the Seat icon next to that Venue to open the Seating Plan Builder. This is where you can design and manage the seat arrangement for the selected location.
6. Create a New Seating Layout or Modify an Existing One Using the Seating Plan Builder
On the Seating Plan page, you can create a new layout by clicking the Add New Seating Plan button, or edit any existing ones linked to that Venue.

7. Set Up Seat Visuals and Define Seating Areas for your Seating Layout
On the Add New Seating Plan page, start by configuring how seats will appear to attendees:
- Seat Plan Name – Enter a name to identify this seating layout.
- Available Colour – Choose a color to represent seats that are open for booking.
- Booked Colour – Set the color for seats that have already been booked.
- Reserved Colour – Choose a color for seats that are blocked and not available for booking.
- Selected Colour – Define the color users will see when selecting a seat during checkout.
Once these general settings are added, click the Add New Area button to define a specific seating section.
In the new area panel:
- Area Name – Name the section of the venue (e.g., Balcony, VIP, General).
- Seating Capacity – Define the total number of seats (this will auto-calculate based on rows × columns).
- Rows – Enter the number of seat rows.
- Columns – Enter the number of seat columns.
Then, click the Create Area button to generate the seating layout grid for that section.
You can further adjust the layout using the following options:
- Add/Remove Aisles – Insert walkways between seats by selecting a row or column.
- Reserve – Select seats that should be blocked from booking and mark them as reserved.
- Hide Seats – Remove seats from the display if they should not be visible to users.
- Reset Current Selection – Undo the current changes made during the session.
After all modifications are complete, click Save to apply your finalized seating layout.

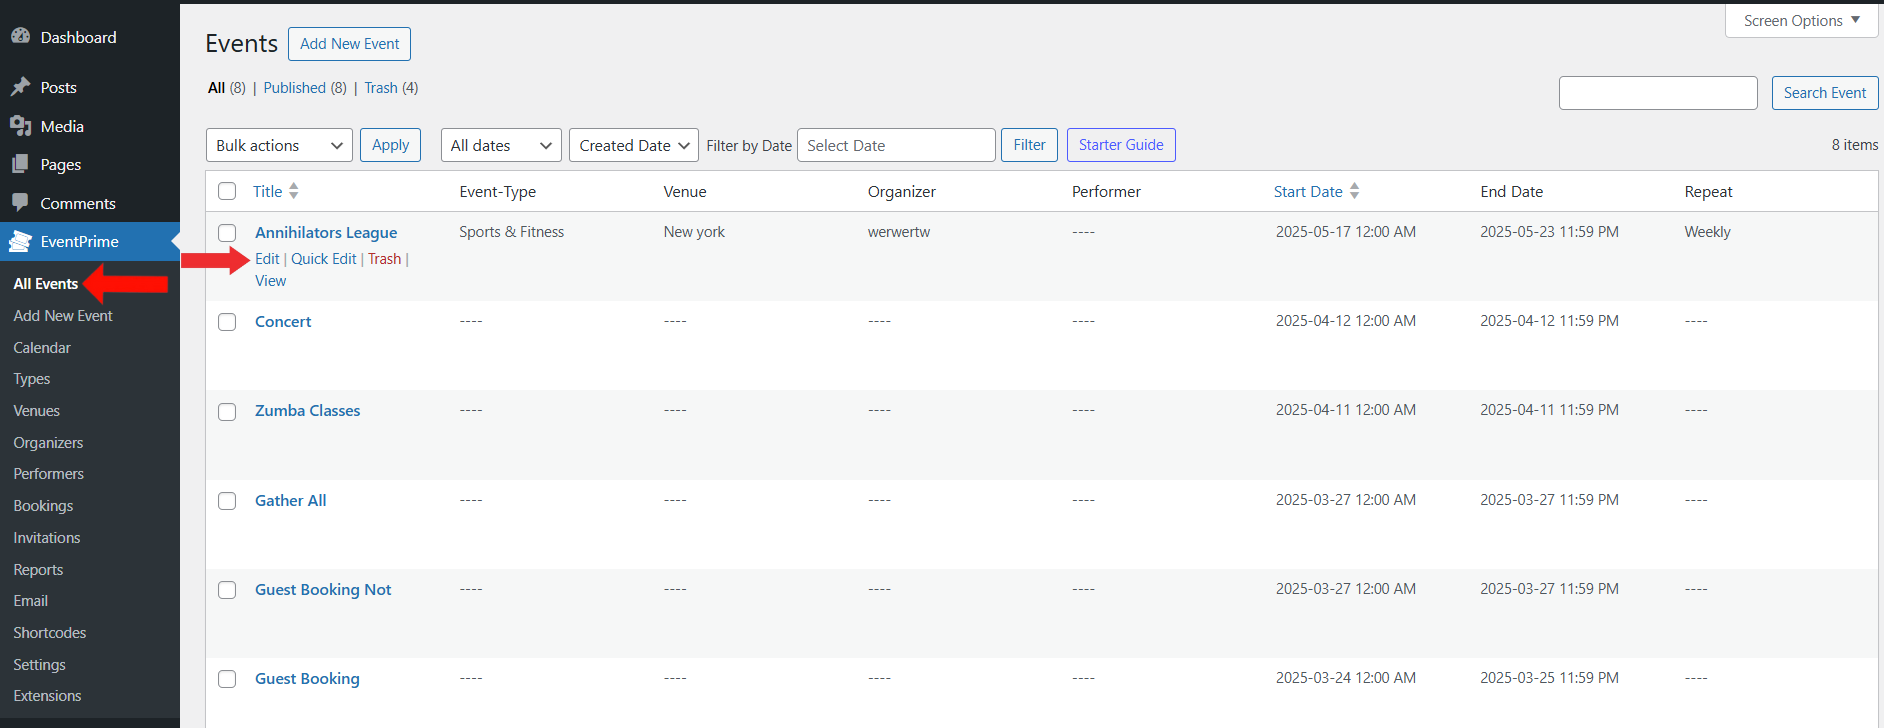
8. Select the Event Where You Want to Add Seating Plan
- Navigate to the EventPrime menu and select the All Events submenu.
- From the list of Events, click the Edit button for the Event where you want to enable seat-based ticketing.
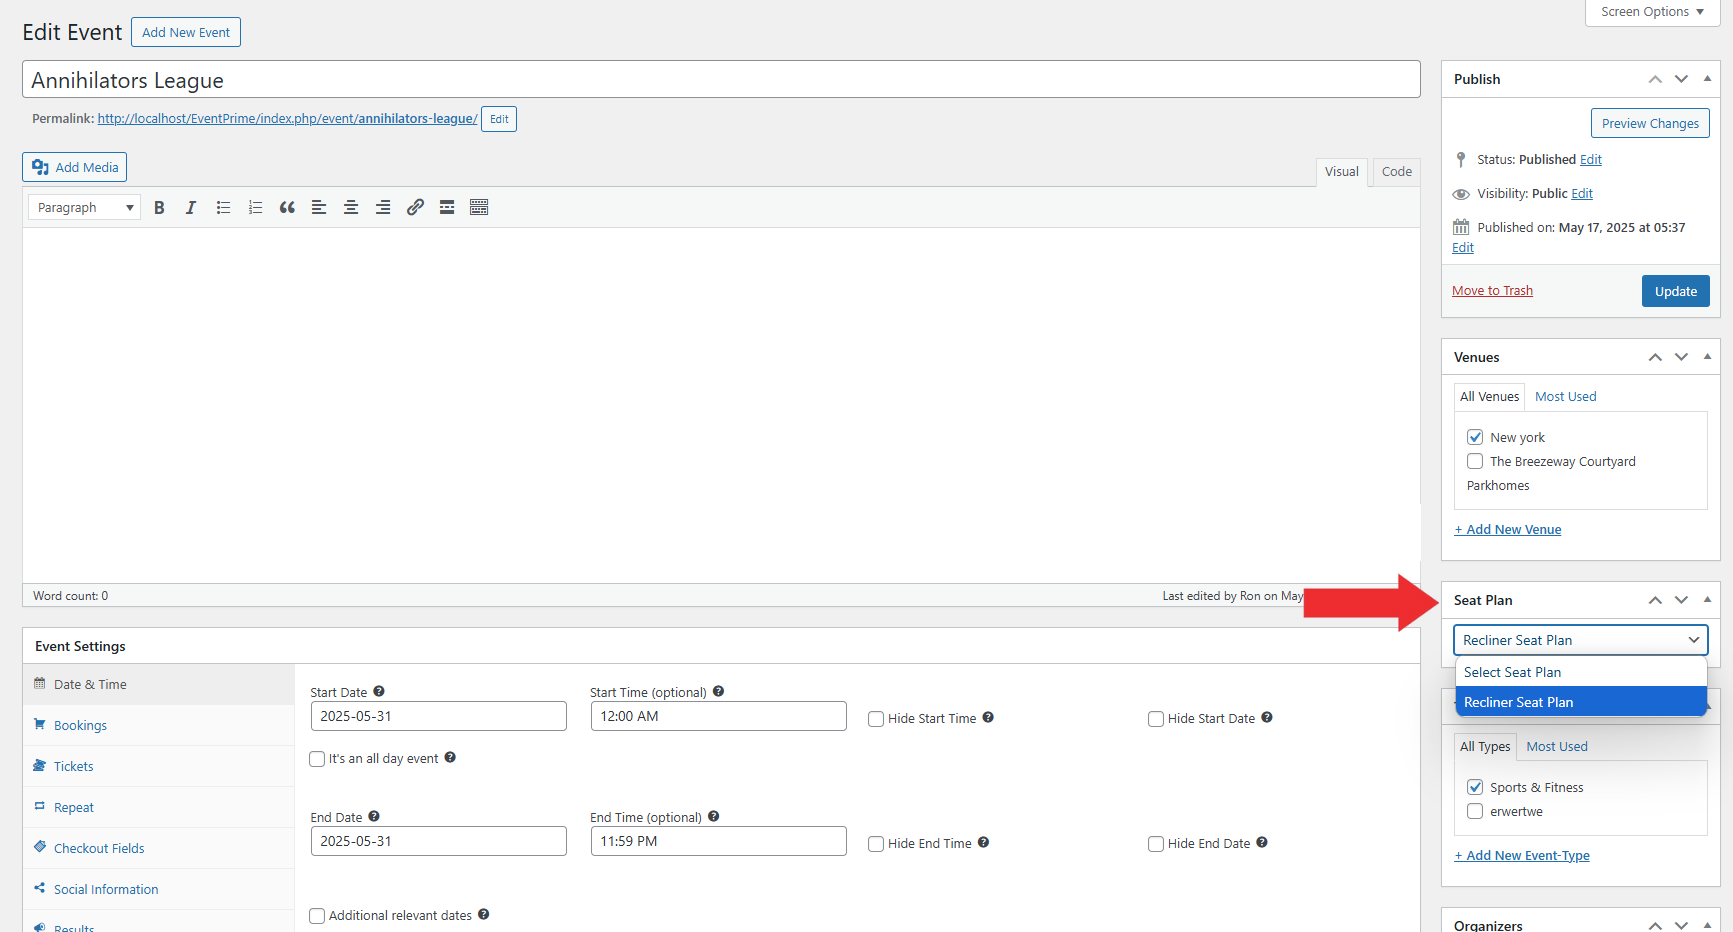
9. Assign a Saved Seating Plan to the Selected Event
- On the Edit Event page, locate the Seat Plan metabox on the right side appear after selecting Venues.
- From the dropdown, select the seating plan you previously created for this Event.
- Click Update to save and apply the selected seat plan to the Event.
10. Create or Edit Ticket Type to Enable Seat Assignment
- On the Edit Event page, scroll down to the Event Settings section and open the Tickets tab.
- Here, either create a new ticket type or edit an existing one.
- Next to each ticket type, you’ll find a Seat icon. Click this icon to begin assigning seats to that specific ticket.
Important: Ensure that the ticket quantity matches the total seating capacity—including any reserved seats.
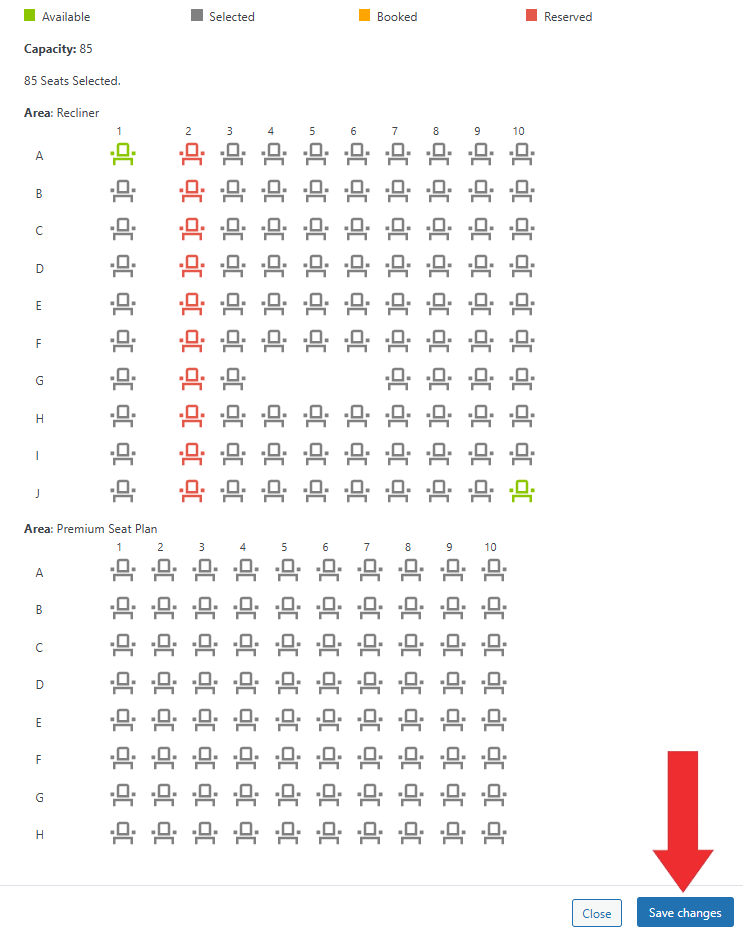
11. Assign Ticket Types to Specific Seats
- On the Seating Plan interface, click on the seats you want to assign to the selected ticket type.
Each selected seat will increment the seat counter displayed at the bottom of the seat selection area. - Once you’ve selected the required number of seats, click Save Changes to apply the seat assignment.
- Now, return to the Edit Event page and click Update once more to confirm and activate the seating configuration for the Event.
Frontend View
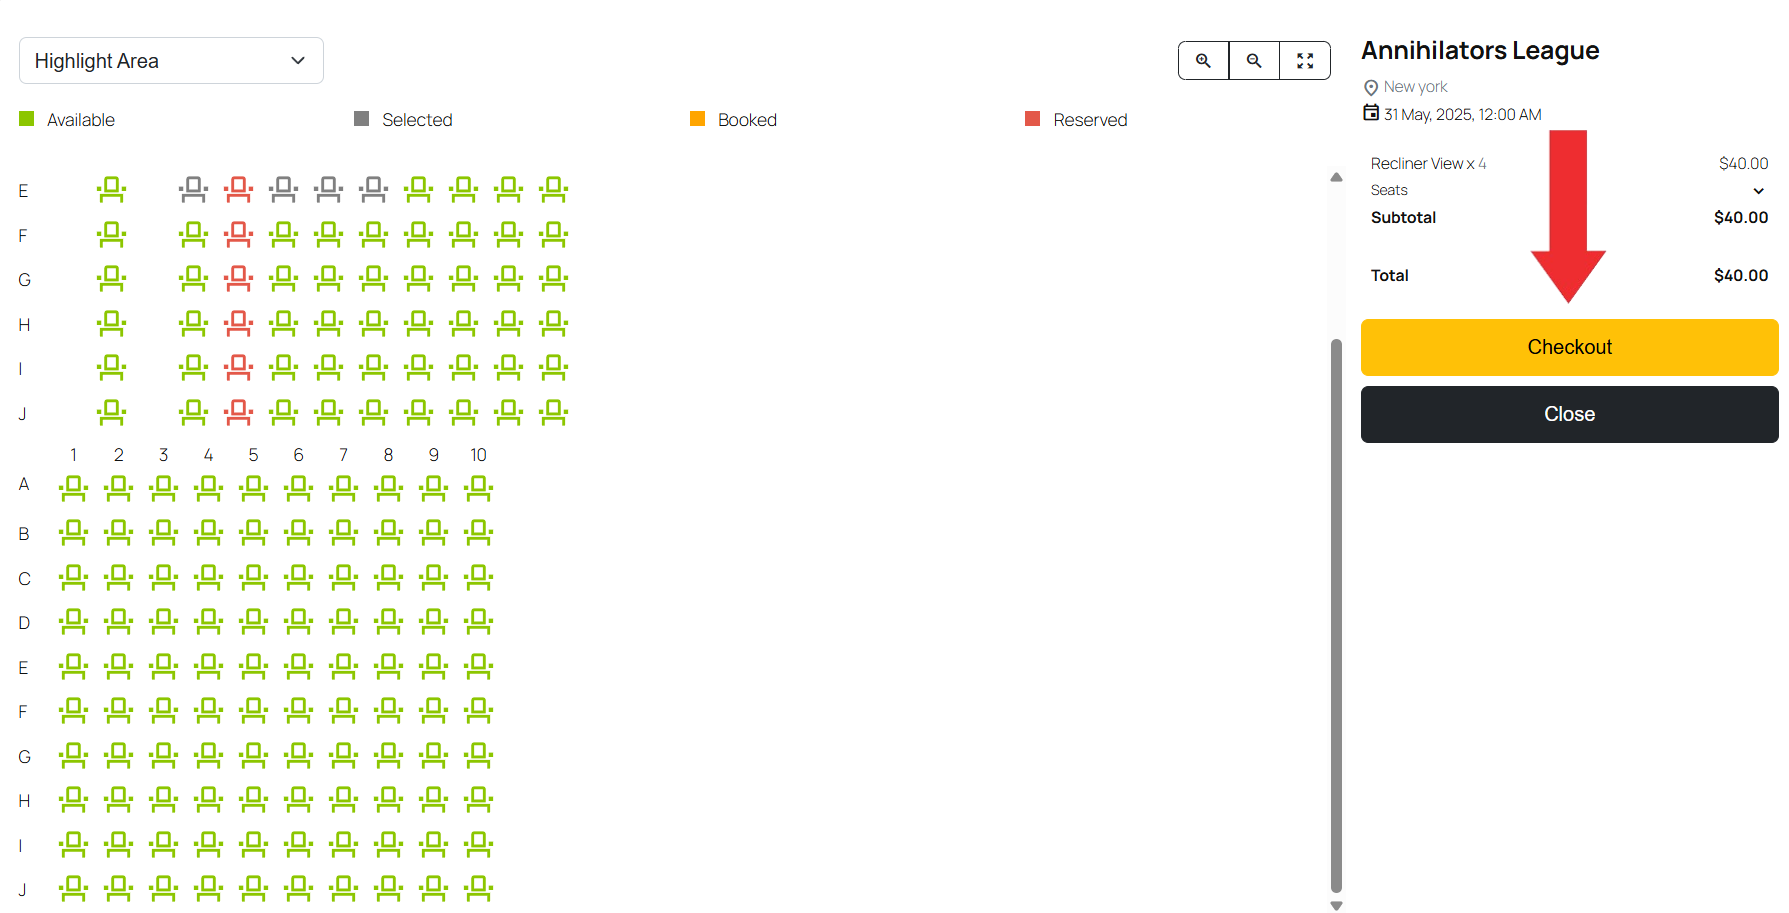
When visitors open the Event booking page, they will see a live seat map based on the configured seating layout.
Users can:
- View available, selected, booked, and reserved seats—each color-coded for clarity.
- Select their desired seats directly from the interactive map.
- See the selected seats and total price displayed on the right-hand side.
- Click the Checkout button to proceed with the booking.
Once the booking is completed, the selected seat details will be visible under the user’s Booking Details page.
Conclusion
The Live Seating extension in EventPrime makes it easy to set up and manage seat-based arrangements for your Events. You can create detailed seating layouts, assign specific seats to ticket types, and let users choose their seats directly during booking.
Questions, Support & Custom Solutions
- Need more details or can't find what you're looking for? Let us know how we can help! Contact our support team here.
- Looking for a tailor-made solution to meet your specific needs? Our dedicated customization team is here to help! Use this link to share your requirements with us, and we'll collaborate with you to bring your vision to life.
nice, but doesn’t work. People can purchase the same seats….
Hello,
We would like to share that the issue has been addressed and the resolution will be deployed with our upcoming release.
If you have any further concerns or inquiries, please feel free to write to us.
Always happy to help!
Did you fix this yet?
Thanks for reaching out to us.
The issue has been resolved and the fixes are now live.
If you have any further questions, please don’t hesitate to reach out to us.
The above instructions say there’s a “Seat Plan” box in the specific event page. Although I already created a seating plan for the Venue, that box doesn’t appear in the event page.
In addition in the seating plan for the venue I cannot delete the old seating plans I don’t use anymore
Thank you for reaching out.
To implement the live seating extension and find the Seat Plan box on the specific event page, please follow these steps:
We’ve identified the issue with deleting old seating plans in the venue’s seating plan and will fix this in our upcoming releases
If you have any further questions, please don’t hesitate to reach out to us.
Hello Support,
I have uploaded a Business Plan Seating Plugin.
1) I created a seating plan which shows and saved.
2) In create an event and Tickets the seating plan is activated and seat showing.
3) In the create event page same as above create ticket in right column Venues is showing i have only created 1 venue, and also the 1 only seating plan created is listed / showing
4) In the edit venue section it shows the only 1 venue with a seat showing and ID42 below that there is a is a Seat Plan ID top & bottom arrow No ID number.
5) Front end when i get tickets now the message appears No seat data found?
Would appreciate your assistance to resolve the issue.
The website is in maintenance mode.
Thank You
Kanti
After adding the venue in which seating plan is created on edit event page a seating plan metabox appears select the seat plan and update it. After that please follow the process given below.
If you are still experiencing issues, we recommend contacting our support team directly for further assistance. We are always happy to help. You can reach our official support through the following support contact link: https://theeventprime.com/support/.
Hi, my seat number does not display after purchase on the ticket or anywhere else for that matter.
Thank you for bringing this to our attention.
We are aware of the issue with seat numbers not being displayed on the tickets. Our team is actively working on this, and the fix will be included in our upcoming release, version 4.0.8.0.
If you have any further questions, please don’t hesitate to reach out to us.
I do have a question, if i need to use my own map, with the distribution of my place, can i do it with your plugin? (its a mix between a space for stand up, and some tables.
Thanks for reaching out to us.
You can add the seating plan image or PDF within the description section of your event. Additionally, EventPrime provides a built-in interactive seating plan feature, where users can select their seats directly from the frontend during booking.
If you have any further questions, please don’t hesitate to reach out to us.
Is it possible to add different ticket types for an event held in a venue with a seating plan? Let’s say we have tickets sold at different prices, such as “Student” and “Adult.” Let’s also assume the venue is divided into three sections, A, B, and C, with different prices for each section. It seems these two scenarios are possible individually. But how can we allow different ticket types to purchase tickets from the same section of the venue? So that, both “Student” and “Adult” ticket types should be able to buy tickets from the same section of the venue at different prices.
With the Live Seating extension, EventPrime follows a seat-to-ticket-type mapping model, which means:
So while you can: