
Overview
The Zoom Integration extension in EventPrime allows you to integrate your Events with Zoom’s video conferencing features. You can easily link Zoom meetings to specific Events, providing a seamless virtual Event experience for both Organizers and attendees.
Prerequisite
Make sure you have EventPrime and the Zoom Integration extension installed and activated on your WordPress site.
If you don’t have the extension, you can get it here: Zoom Integration Extension for EventPrime
Steps to Use the Zoom Integration Extension
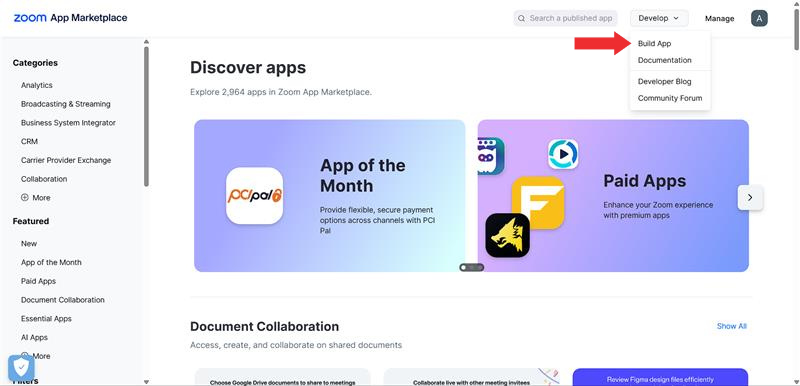
1. Generate and Copy Your Zoom API Credentials
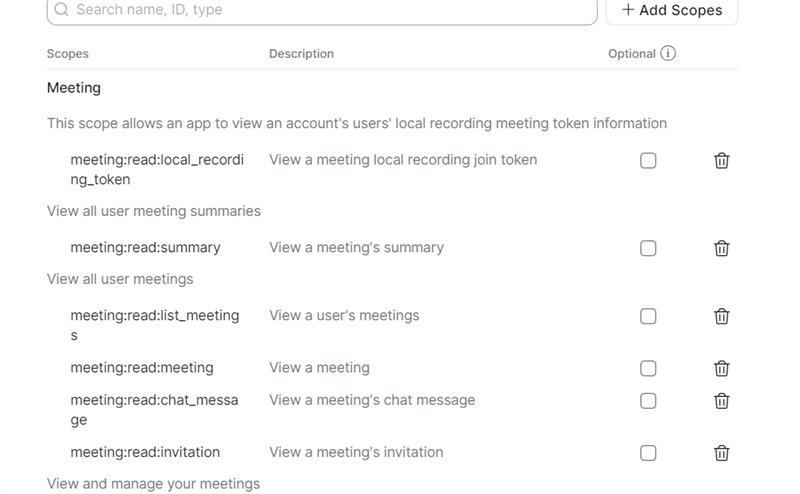
- Go to https://marketplace.zoom.us/ and log in or create a new Zoom account.
- Click on the Develop button in the top-right corner and select Build App option from the dropdown menu.
- Select General App and click the Create button.
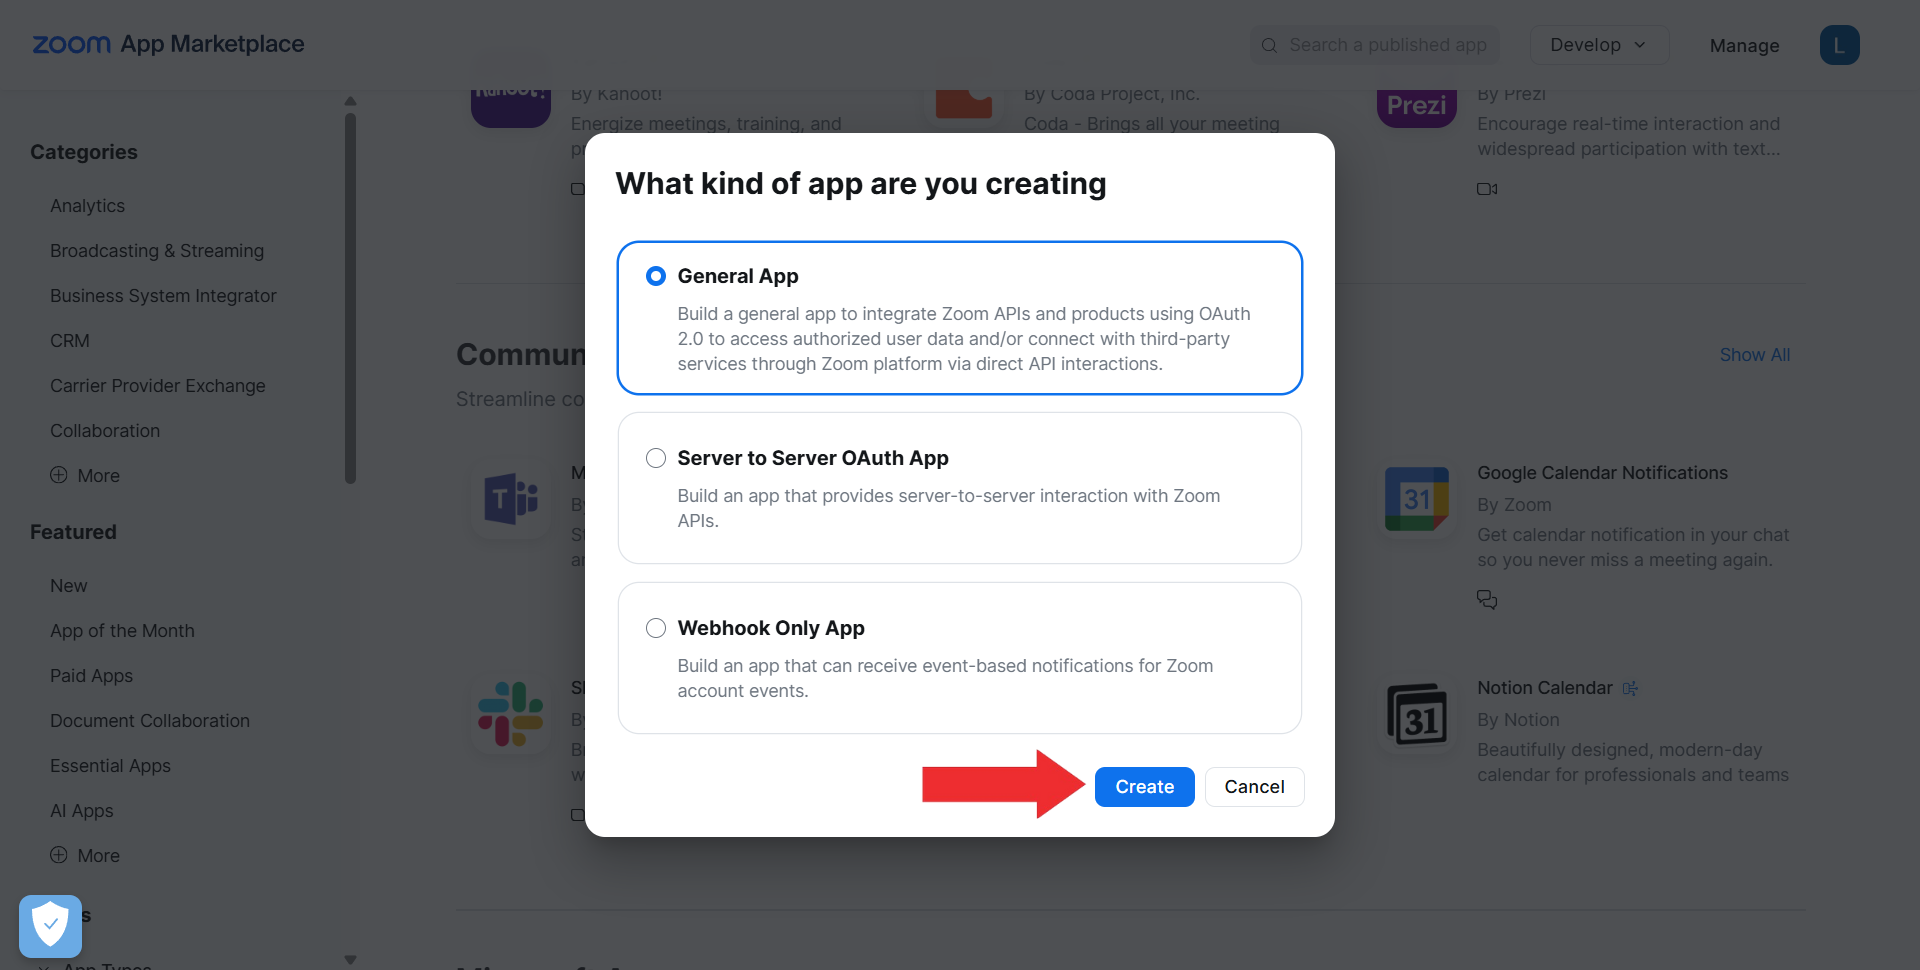
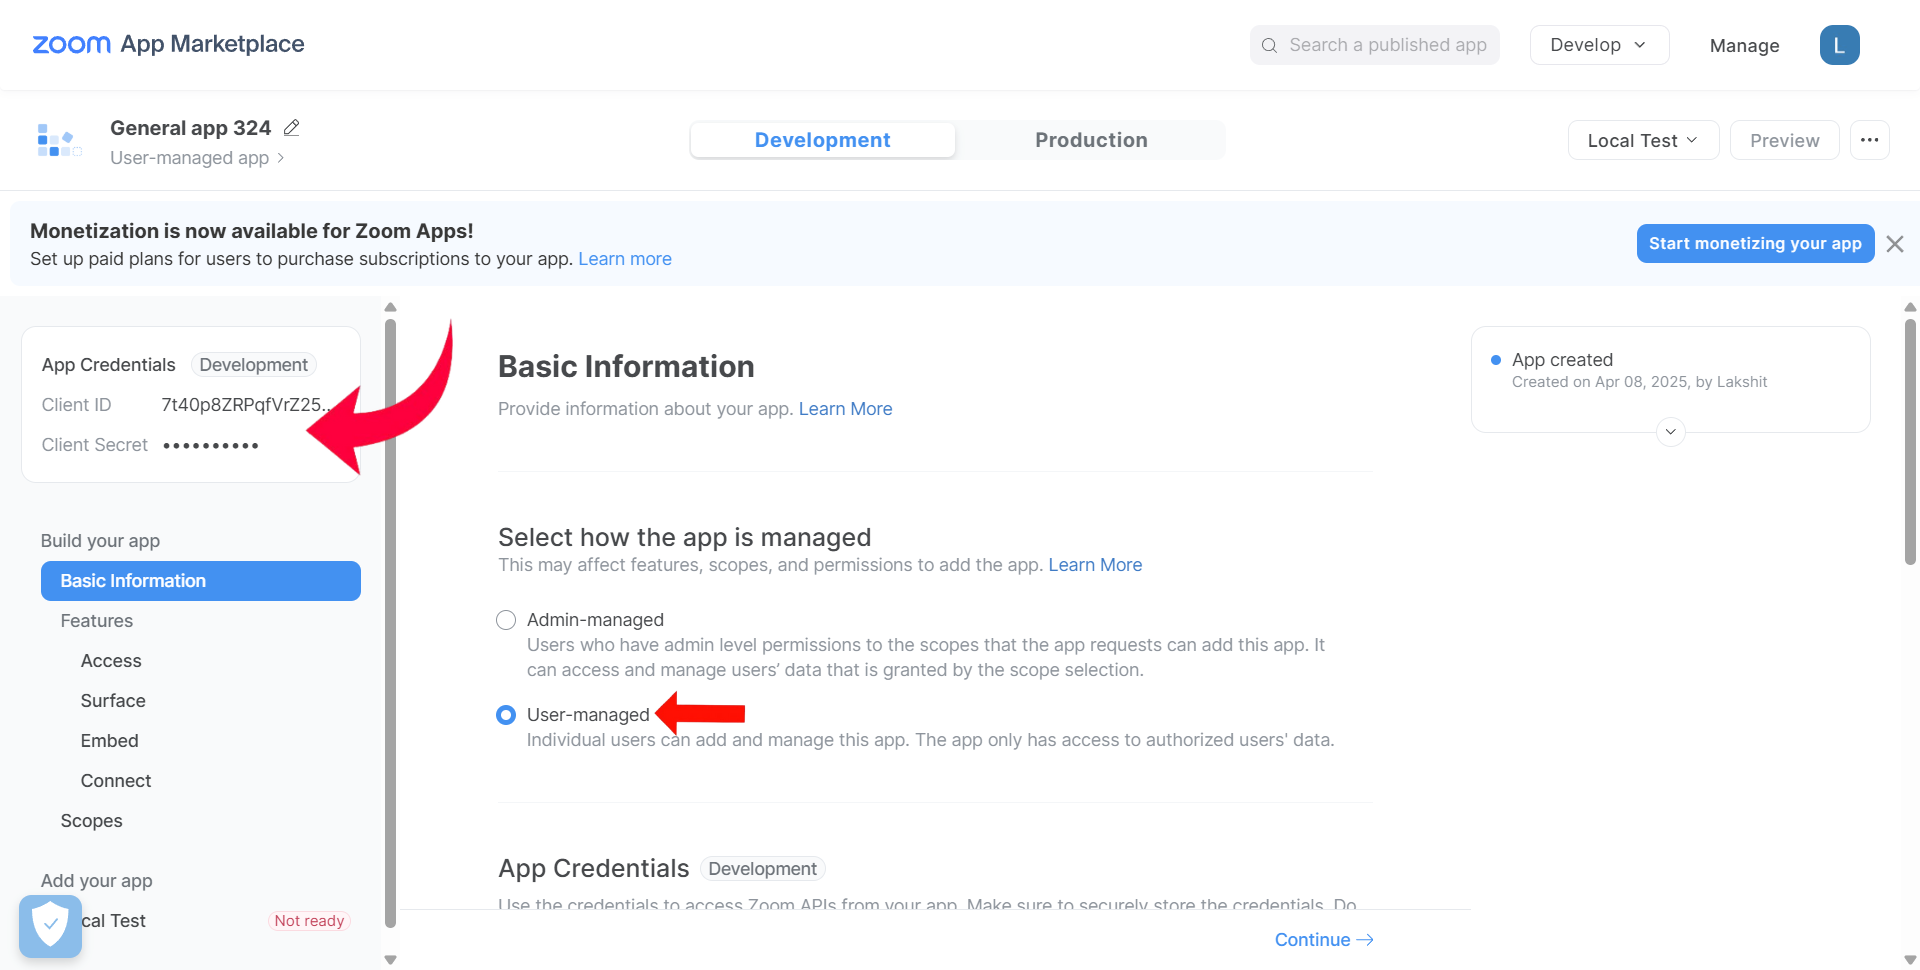
- On the same page, copy the Client ID and Client Secret and choose User-Managed under Select how the app is managed section.
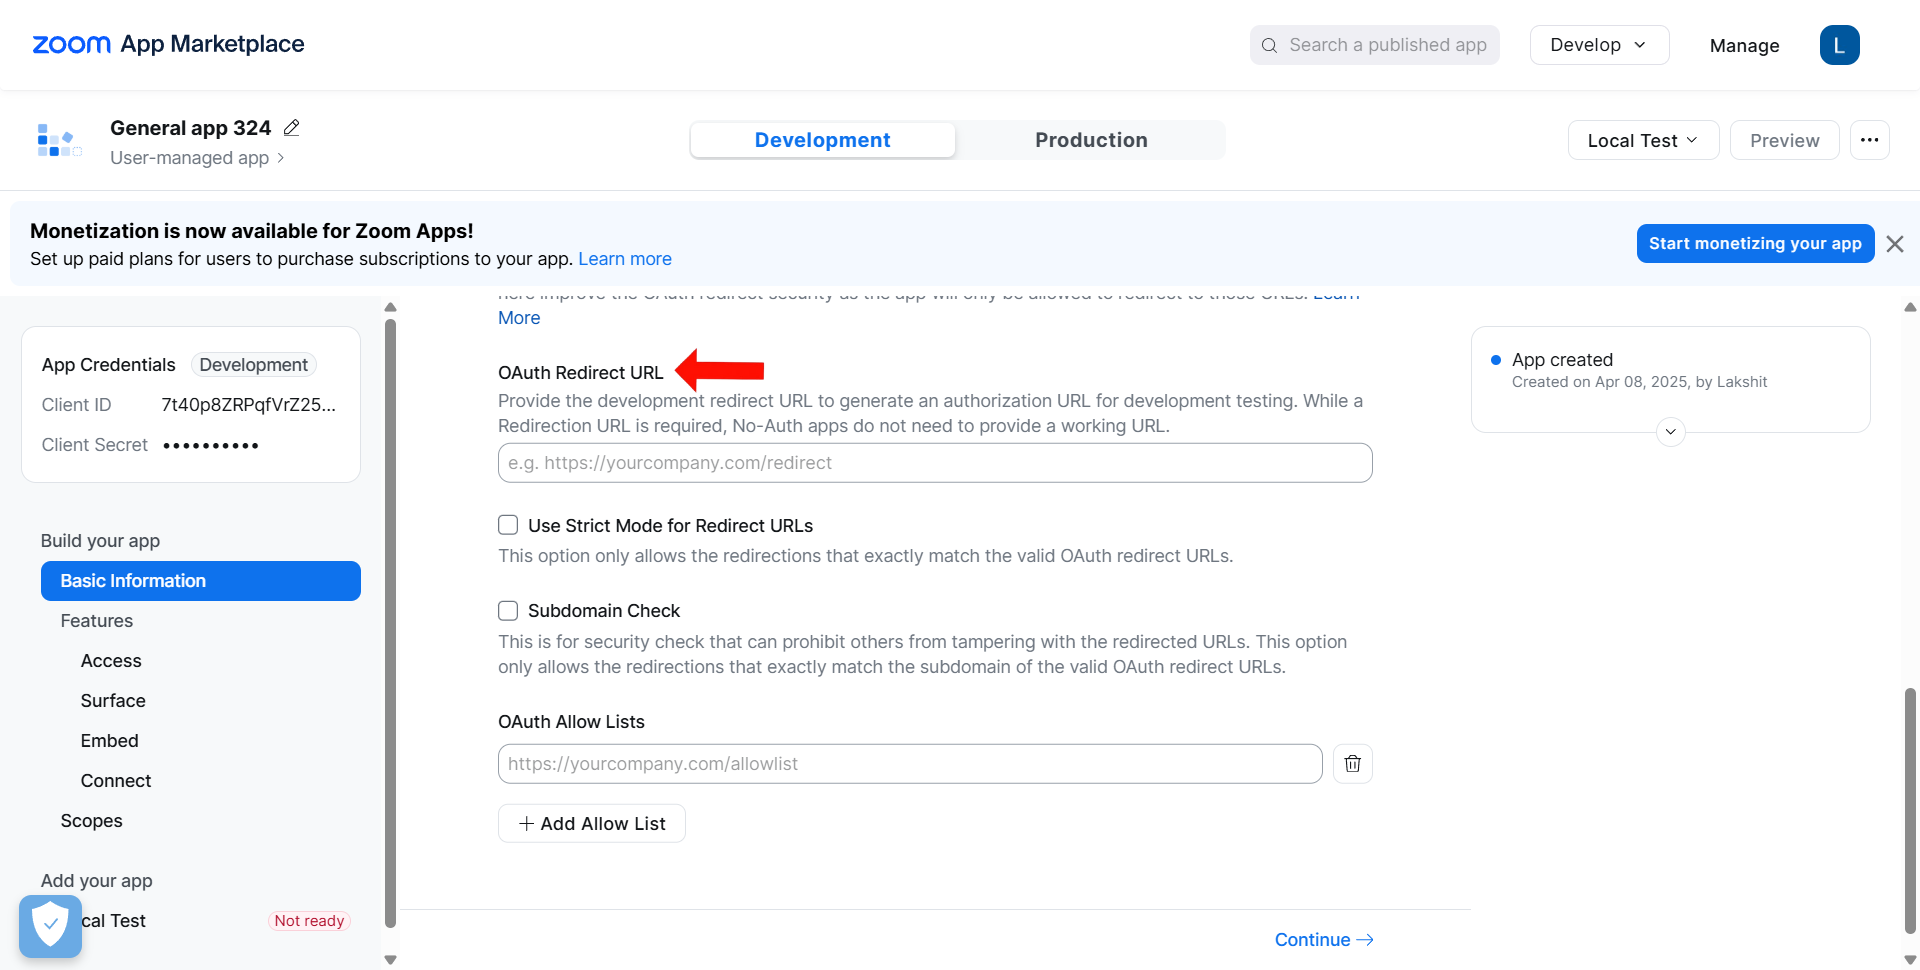
- Scroll down to the OAuth Information section and paste your OAuth Redirect URL (e.g.,
https://yourcompany.com/redirect) which you will find in the EventPrime Zoom Integration Settings page. - Click Continue until you reach the Scopes section.
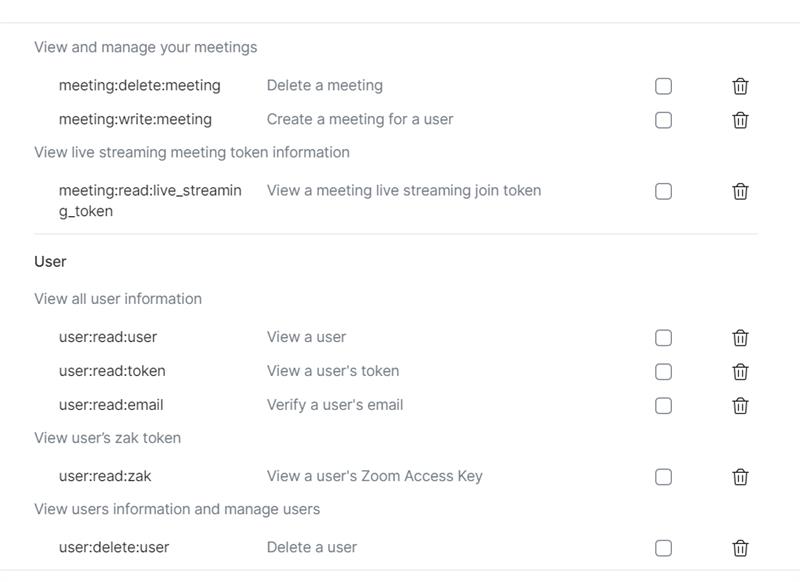
- In the Add Scopes page, add all the scopes shown in the below screenshots.

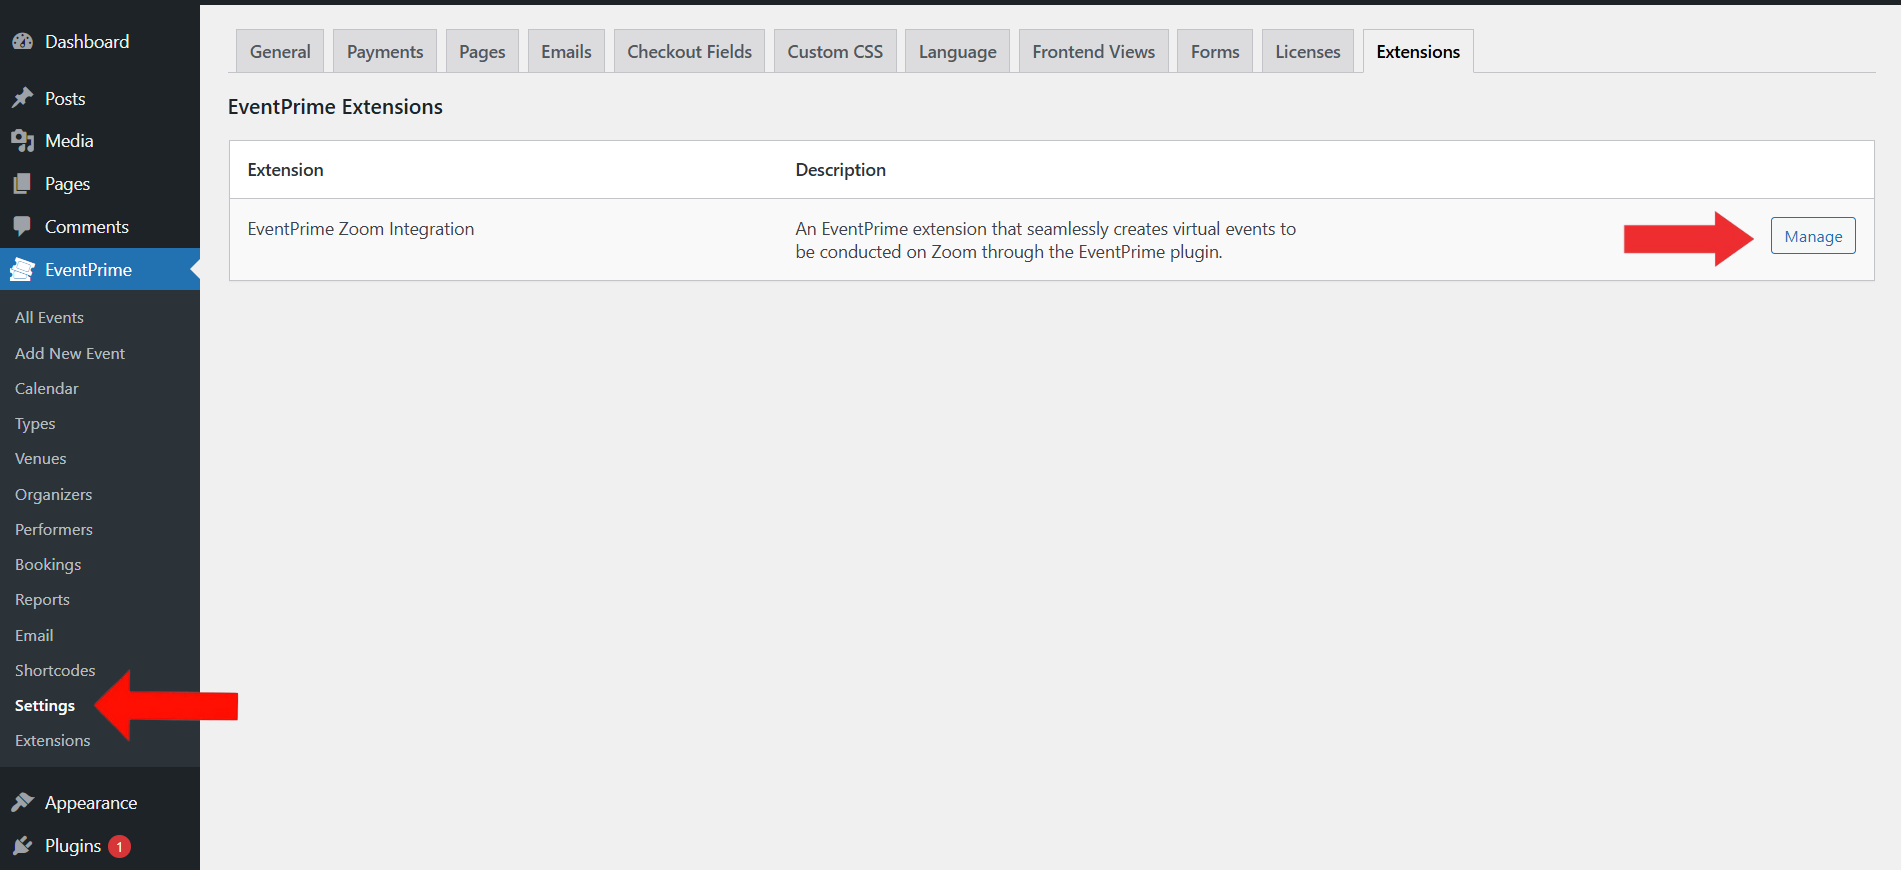
2. Access Zoom Integration Settings from EventPrime
- Navigate to EventPrime menu, and select Settings submenu.
- Go to Extensions tab, and click Manage button for EventPrime Zoom Integration.
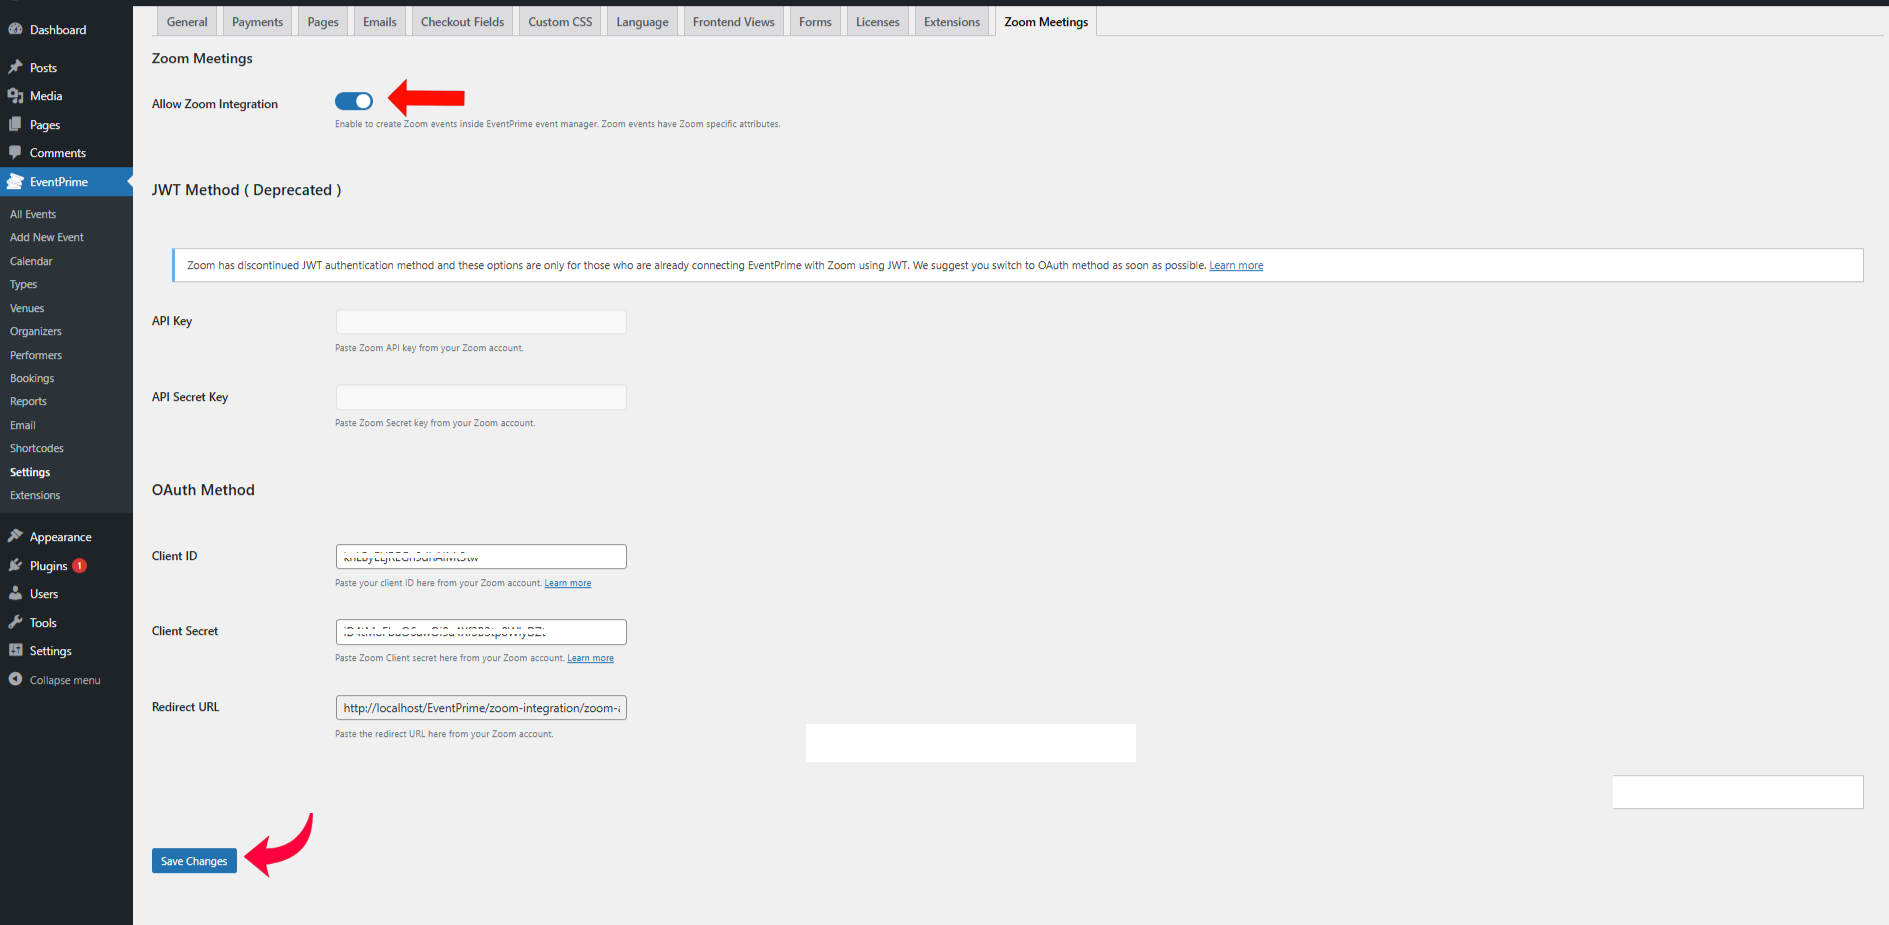
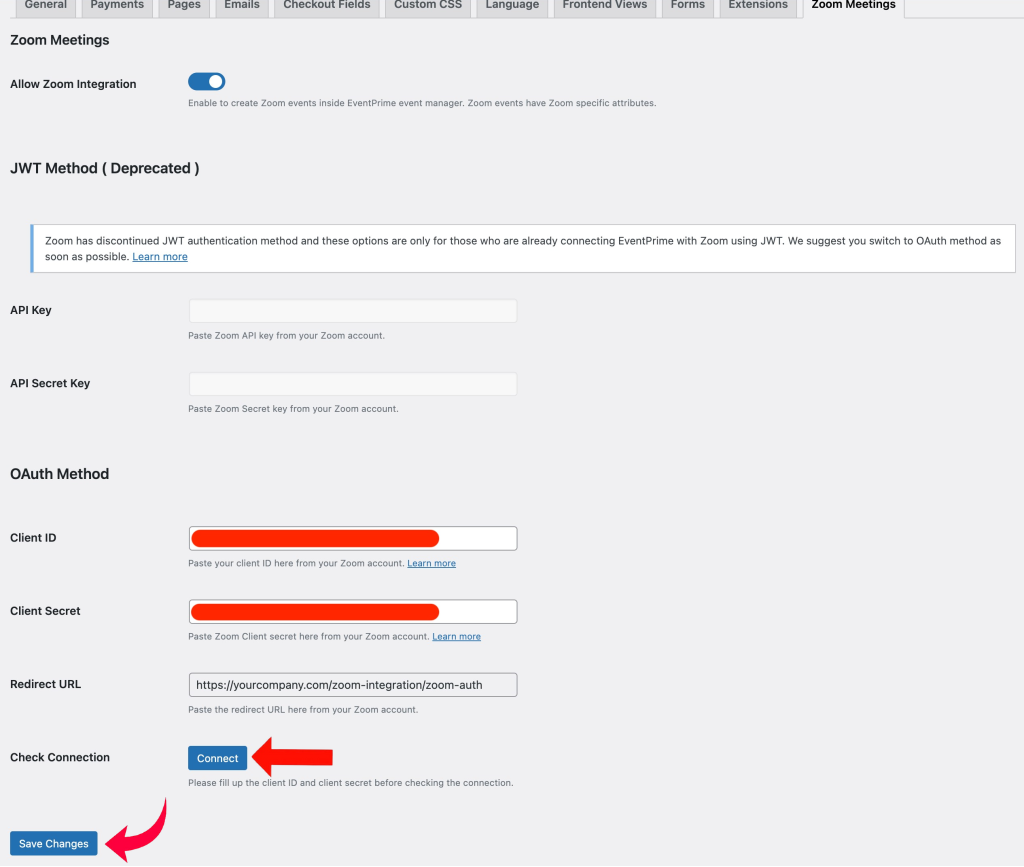
3. Enter Your Zoom API Credentials and Save the Integration Settings
- On the Zoom Integration Settings page, enter the Client ID and Client Secret you copied from your Zoom Marketplace app.
- Below these fields, you’ll see the OAuth Redirect URL in Redirect URL field generated by EventPrime.
- Use this URL while configuring your OAuth app in Zoom (as described in Step 1).
- Once the credentials are filled in, click the Save Changes button.
4. Connect Your Zoom Account to EventPrime
- Once your API credentials are saved, a Connect button will appear on the Zoom Integration Settings page.
- Click the Connect button. You will be redirected to the Zoom authorization page.
- On the Zoom authorization page, check the terms and conditions checkbox.
- Click the Allow button to grant permission and complete the integration.
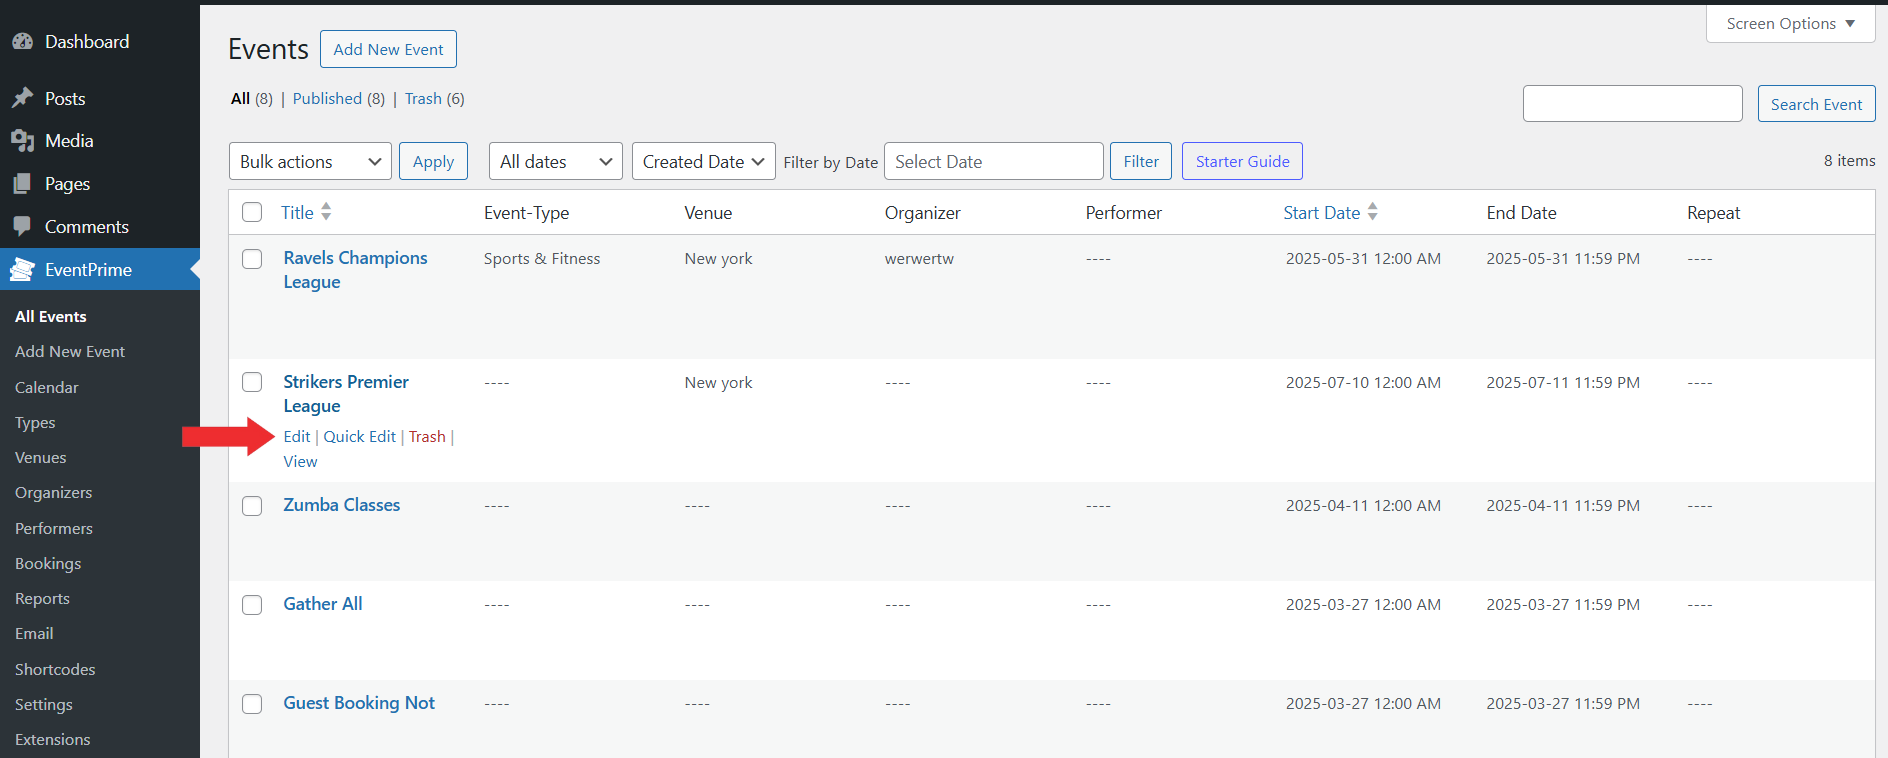
5. Select the Event for Which You Want to Enable Zoom Meeting
- Navigate to the EventPrime menu, and select All Events submenu.
- In the list of Events, click the Edit button for the Event where you want to enable Zoom integration..
6. Enable Zoom Integration for Event
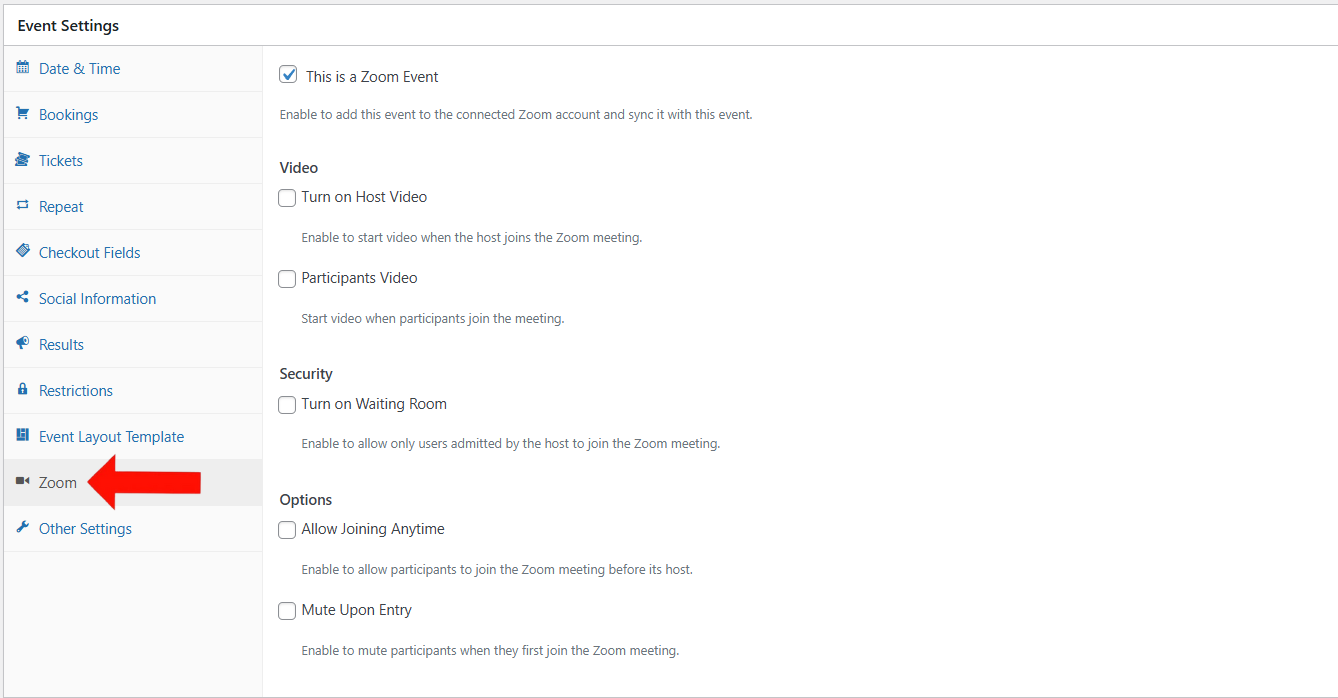
- On the Edit Event page, go to Event Settings section and select the Zoom tab.
- Check the This is a Zoom Event checkbox to enable Zoom integration for this Event.
- Check Turn on Host Video checkbox to automatically enable the host’s video when the meeting starts.
- Check Participants Video checkbox to enable video for attendees as they join the meeting.
- Check Turn on Waiting Room checkbox to let attendees wait until admitted by the host.
- Check Allow Joining Anytime checkbox to let participants join the meeting before the host starts it.
- Check Mute Upon Entry checkbox to mute all participants automatically when they enter the meeting.
- Update the Event to apply these settings.
Frontend View
On the Event Details page, Events enabled with Zoom integration will display a Zoom icon along with meeting information. Admins will see a Start Meeting button directly on the Event page. Clicking this button launches the Zoom session, allowing the host to begin the meeting.

Conclusion
The Zoom Integration extension in EventPrime lets you connect Zoom meetings directly to your Events. You can set up API keys, enable Zoom for specific Events, and start meetings from the Event page. It helps manage virtual Events easily from your WordPress dashboard.
Questions, Support & Custom Solutions
- Need more details or can't find what you're looking for? Let us know how we can help! Contact our support team here.
- Looking for a tailor-made solution to meet your specific needs? Our dedicated customization team is here to help! Use this link to share your requirements with us, and we'll collaborate with you to bring your vision to life.
Hello,
You say “You must use the same email address for creating an account on Zoom that you used for your WordPress admin.” Can it be any admin user or does it have to be the administration email address entered on wp-admin/options-general.php ?
Hello Adrian,
Thank you for using EventPrime!
We’re happy to share that we’ve received this inquiry via our support forum, and it has been successfully resolved by our team..
If you have any further questions, please feel free to contact us.