
Overview
The Advanced Reports extension in EventPrime gives you detailed insights into your Event Bookings, payments, and attendee trends. With advanced filters, graphical reports, and data exports, it helps you track how your Events are performing beyond the basic reports provided in the core plugin.
Prerequisite
Make sure you have EventPrime and its Advanced Reports extension installed and activated on your WordPress website.
If you don’t have the extension yet, get it from here: Get the Advanced Reports Extension
Step to Use Advanced Reports Extension
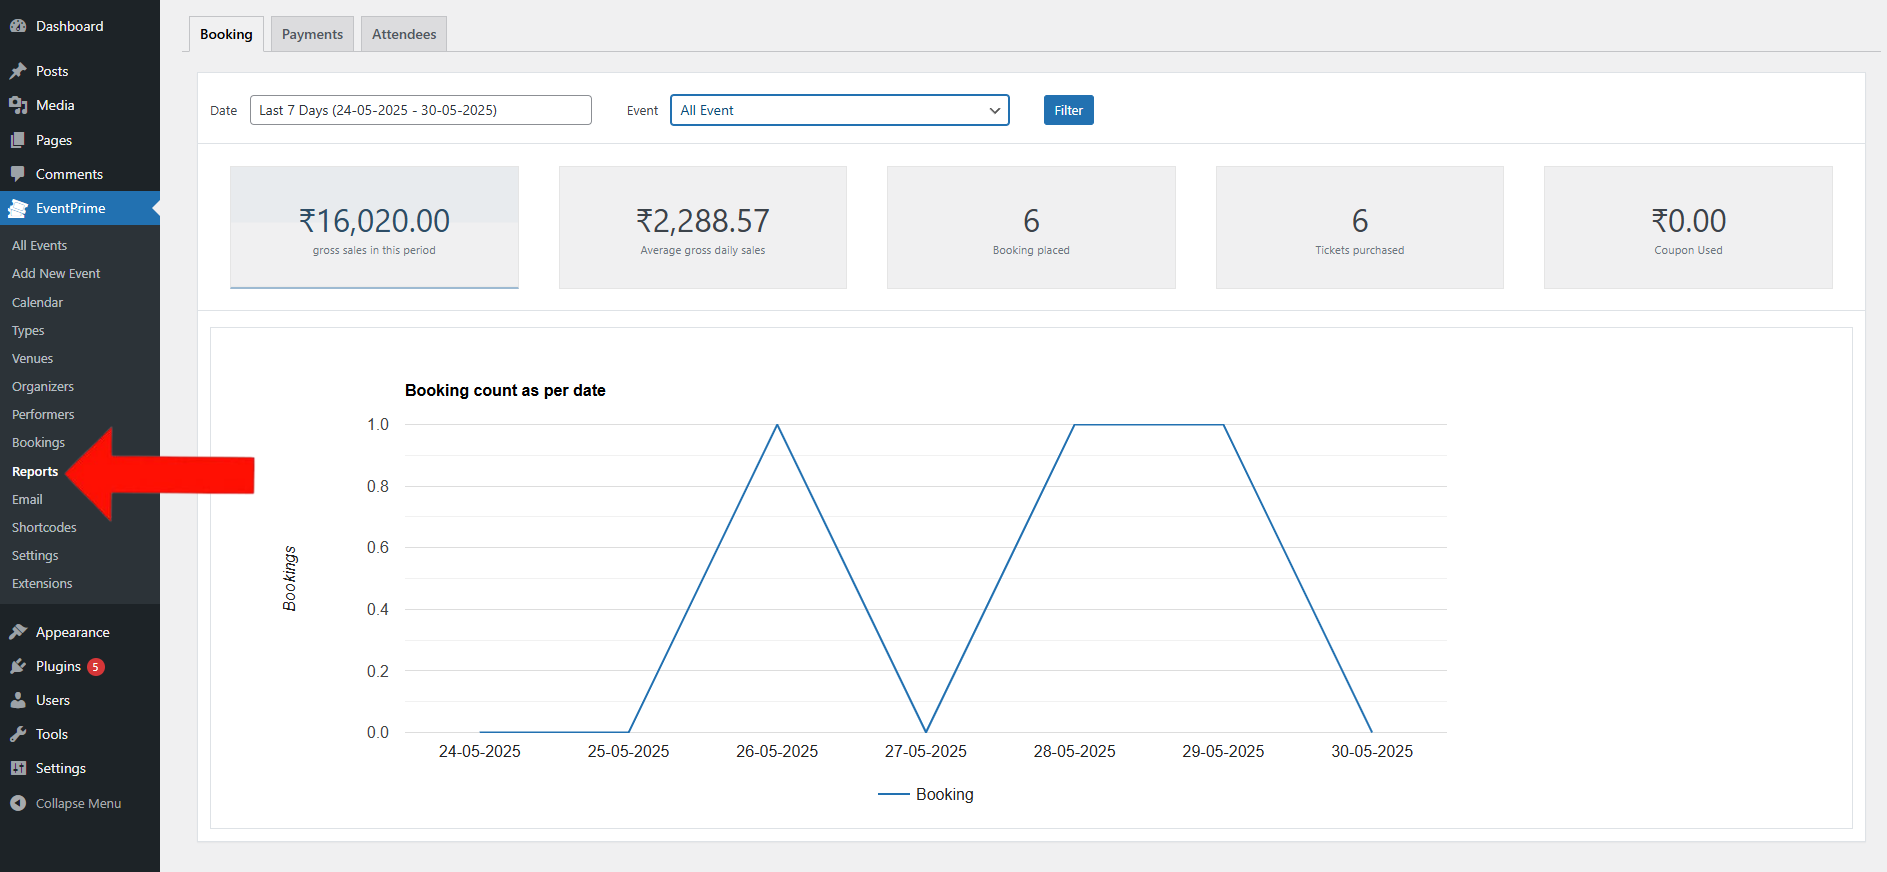
1. Access the Advanced Reporting Section from the EventPrime Menu
- Navigate to EventPrime menu, and select Reports submenu.
Here, you’ll see three tabs:
- Bookings Tab – View a list of completed Bookings with details like Booking date, Event name, and payment gateway. It also includes a graph to track Bookings over time.
Refer to this guide for full details: How to View Event Reports in WordPress - Payments Tab – Review revenue performance using multiple filters like date range, Event, payment method, and Booking status. Graphs and detailed tables help break down total sales, average daily revenue, tickets sold, and more.
- Attendees Tab – Analyze attendee activity by tracking Bookings and attendance trends per date. Visual graphs and a summary of total Bookings, attendees, and revenue are also available in this section.
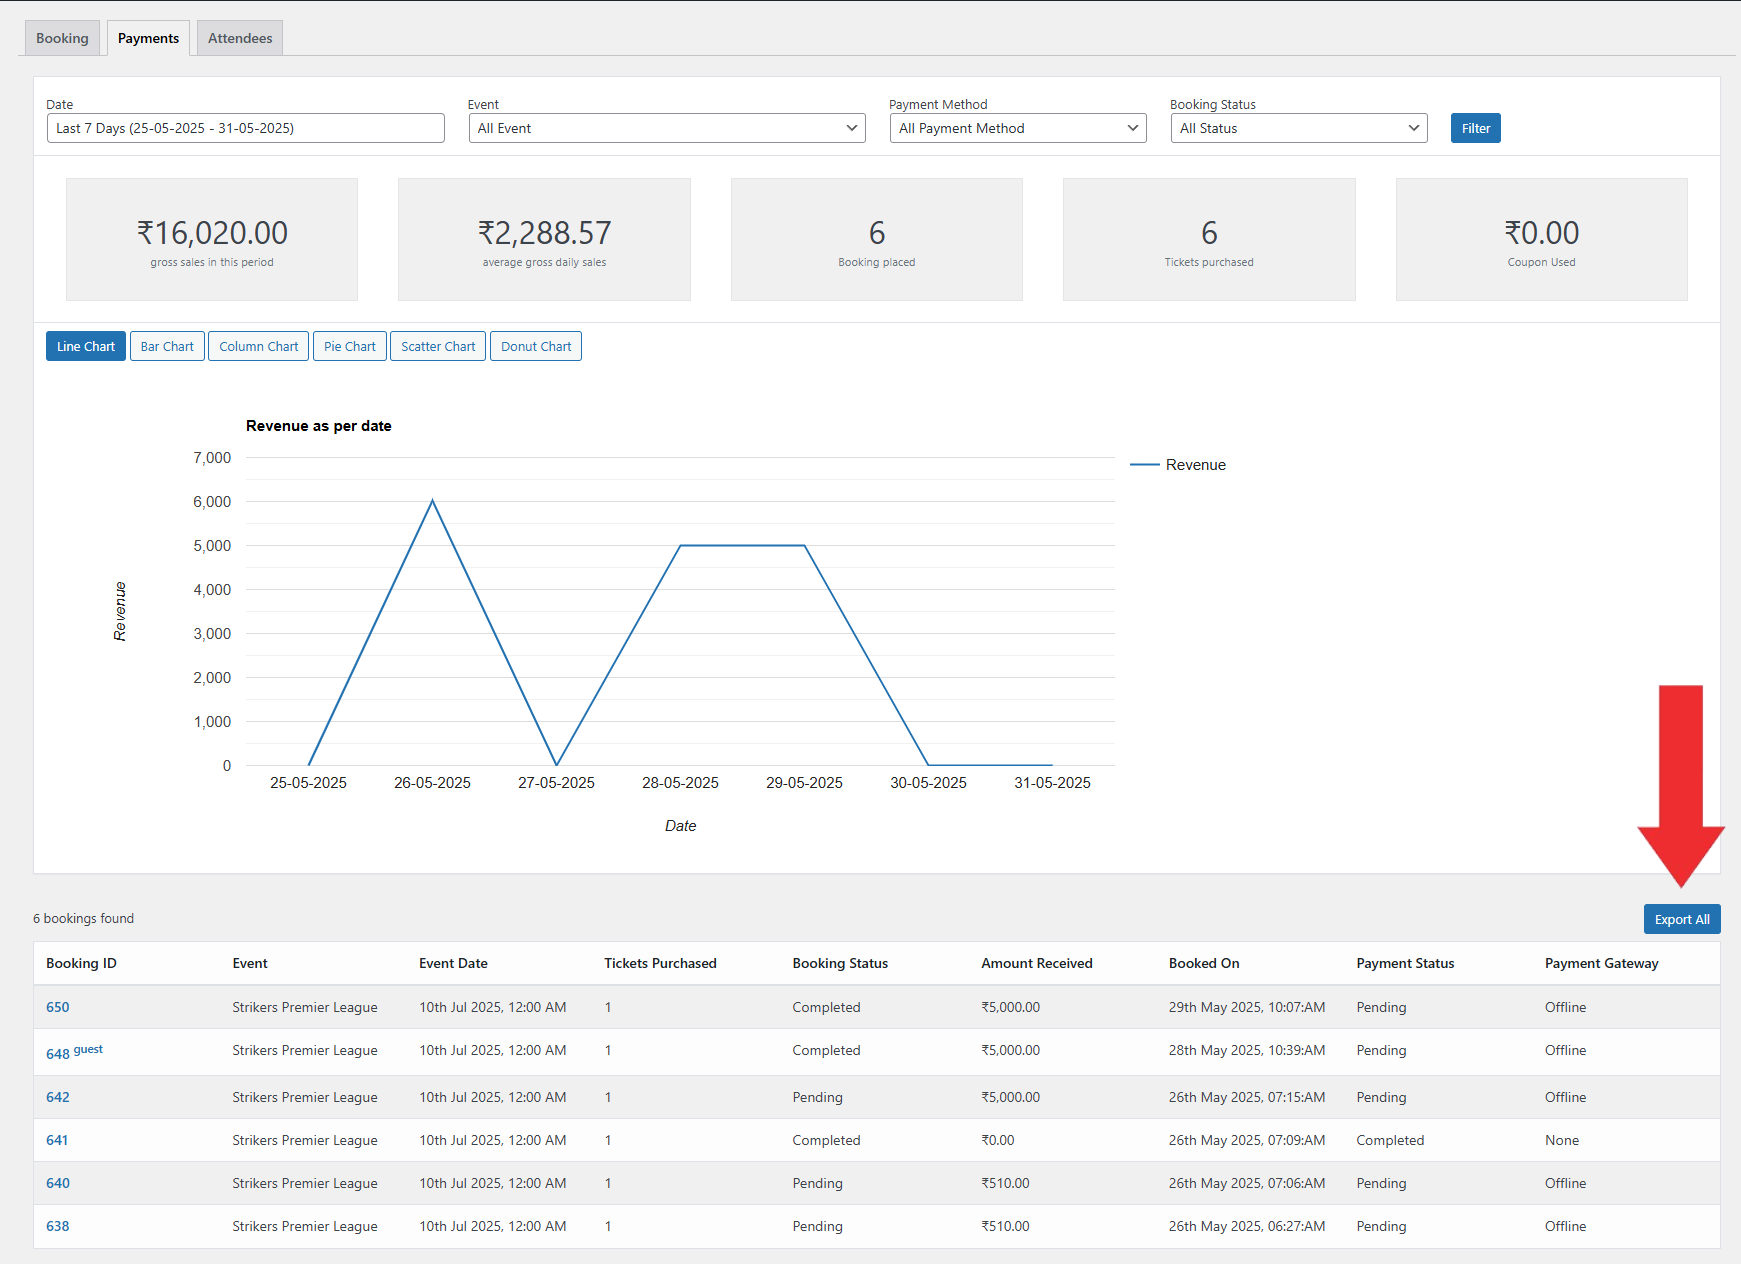
2. Use the Payments Tab to Analyze Revenue and Payment Insights
Click the Payments tab to analyze your Event earnings in detail.
You’ll find the following data points:
- Gross Sales within the selected date range
- Average Daily Sales
- Number of Bookings
- Tickets Purchased
- Coupons Used
You can use the filter options such as :
- Date Range – Choose date range such as Today, Yesterday, Last 7 Days, Last 30 Days, This Month, Last Month, or set a Custom Range.
- Event – Filter the report by a specific Event or view all Events.
- Payment Method – You can filter Bookings based on the payment method used such as Stripe, Paypal, Offline.
- Booking Status – You can filter Bookings based on their status such as Completed, Pending, Cancelled, Refunded, or Failed Bookings.
Below this, a Revenue per Date graph is displayed. You can change the chart type such as Line Chart, Bar Chart, Column Chart, Pie Chart, Scatter Chart and Donut Chart to better visualize data.
A detailed table is also shown which includes:
- Booking ID: A unique identifier for each Booking record.
- Event Name: The name of the Event associated with the Booking
- Event Date: The date of Event scheduled to occur.
- Tickets Purchased: The total number of tickets booked for the Event.
- Amount Received: The payment amount collected for the Booking
- Booked On: The date when the Booking was completed by the user.
- Booking Status: Indicates whether the Booking is Completed, Pending, or Cancelled.
- Payment Status: Displays if the payment has been Received or is still Pending.
- Payment Gateway: Shows which payment method (e.g., PayPal, Stripe) was used.
Click the Export All button to download this report in CSV format for offline analysis.
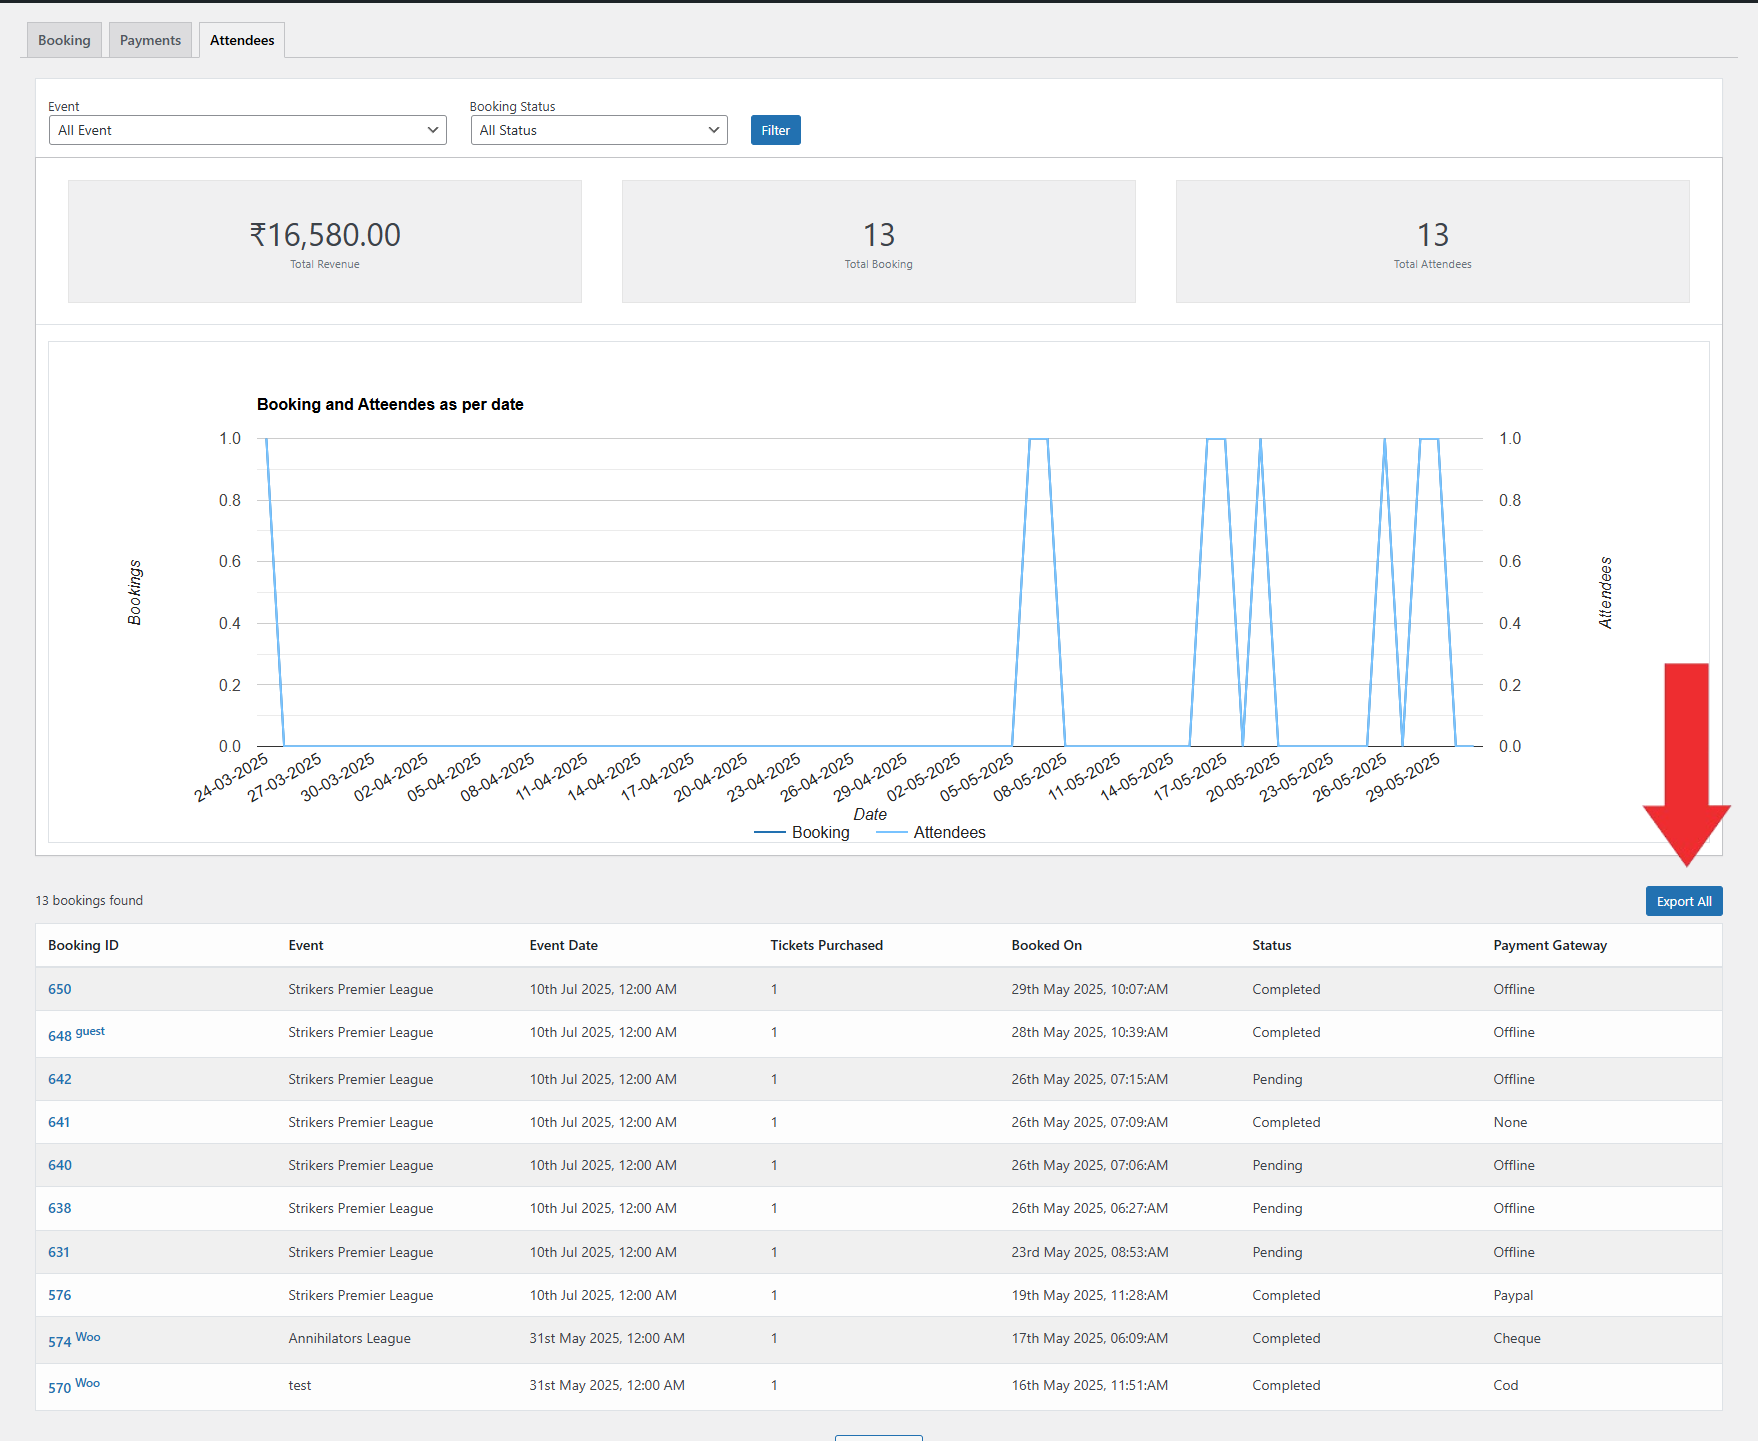
3. Analyze Booking and Attendance Trends Using the Attendees Tab
Click on the Attendees tab inside the Reports section to review attendance performance across Events.
At the top, you’ll see the following summary:
- Total Revenue
- Total Bookings
- Total Attendees
You can apply filters options such as:
- Event – View attendee data for a specific Event or across all Events.
- Booking Status – You can filter results by Completed, Pending, Cancelled, Refunded, or Failed Booking status.
Here you can view a graph that display Bookings and Attendees per Day, helping you analyze Event trends over time.
A detailed table below the graph includes:
- Booking ID: A unique identifier for each Booking record.
- Event Name: The name of the Event that the attendee booked
- Event Date: The date of Event scheduled to occur.
- Tickets Purchased: The total number of tickets booked by attendee.
- Booked On: The date the attendee completed their Booking..
- Booking Status: Indicates whether the Booking is Completed, Pending, or Cancelled.
- Payment Gateway: The payment method used for the attendee’s Booking.
Click the Export All button to download the attendee data in CSV format for offline use.
Conclusion
The Advanced Reports extension in EventPrime helps you track Event earnings, monitor attendee activity, and export Booking data. With detailed filters and visual reports, it offers a clear view of your Event performance for better Event management.
Questions, Support & Custom Solutions
- Need more details or can't find what you're looking for? Let us know how we can help! Contact our support team here.
- Looking for a tailor-made solution to meet your specific needs? Our dedicated customization team is here to help! Use this link to share your requirements with us, and we'll collaborate with you to bring your vision to life.
How can I grant access rights to responsible persons who need insight into the booking lists? They should only be able to view the bookings and, when logged in, be able to book a ticket for a third party. I have already assigned the role of Editor in WordPress, but even with this role, there is no access to the booking lists. I cannot grant Administrator rights to users who are not familiar with the system.
Thank you for your response!
Thank you for reaching out and sharing your query regarding user access levels in EventPrime.
To enable an editor to manage the EventPrime, we recommend utilizing the EventPrime Sponsors extension. This extension allows you to create a specific user account type named “EP Sponsor.” The EP Sponsor role provides access to bookings, enabling your editor to handle event management tasks efficiently.
For more details on the EventPrime Sponsors extension and how it works, please visit the following link:
EventPrime Sponsors Extension
HI
does the advanced reports have a frontend view for organizers, venues and promoters?
Thanks for reaching out to us.
We are already working on the new Advanced Organizer extension for EventPrime. It introduces additional reporting features, with more functionalities planned for upcoming releases.
If you have any further questions, please don’t hesitate to reach out to us.