
Overview
This guide explains how to use EventPrime’s built-in shortcodes to easily display your Events and related information on your WordPress website pages. Learn how to add various Event views, lists of Performers, Venues, Organizers, and more using simple shortcodes.
Prerequisites
The EventPrime plugin must be installed and activated on your WordPress site.
Installation and Activation
- Navigate to your WordPress Dashboard.
- Go to Plugins -> Add New.
- Search for “EventPrime“.
- Find the EventPrime – Modern Events Calendar, Bookings and Tickets.
- Click Install Now.
- Once installed, click Activate.
Upon activation, you can also view detailed information about available Shortcodes by navigating to the EventPrime menu → Shortcodes submenu in your WordPress dashboard.
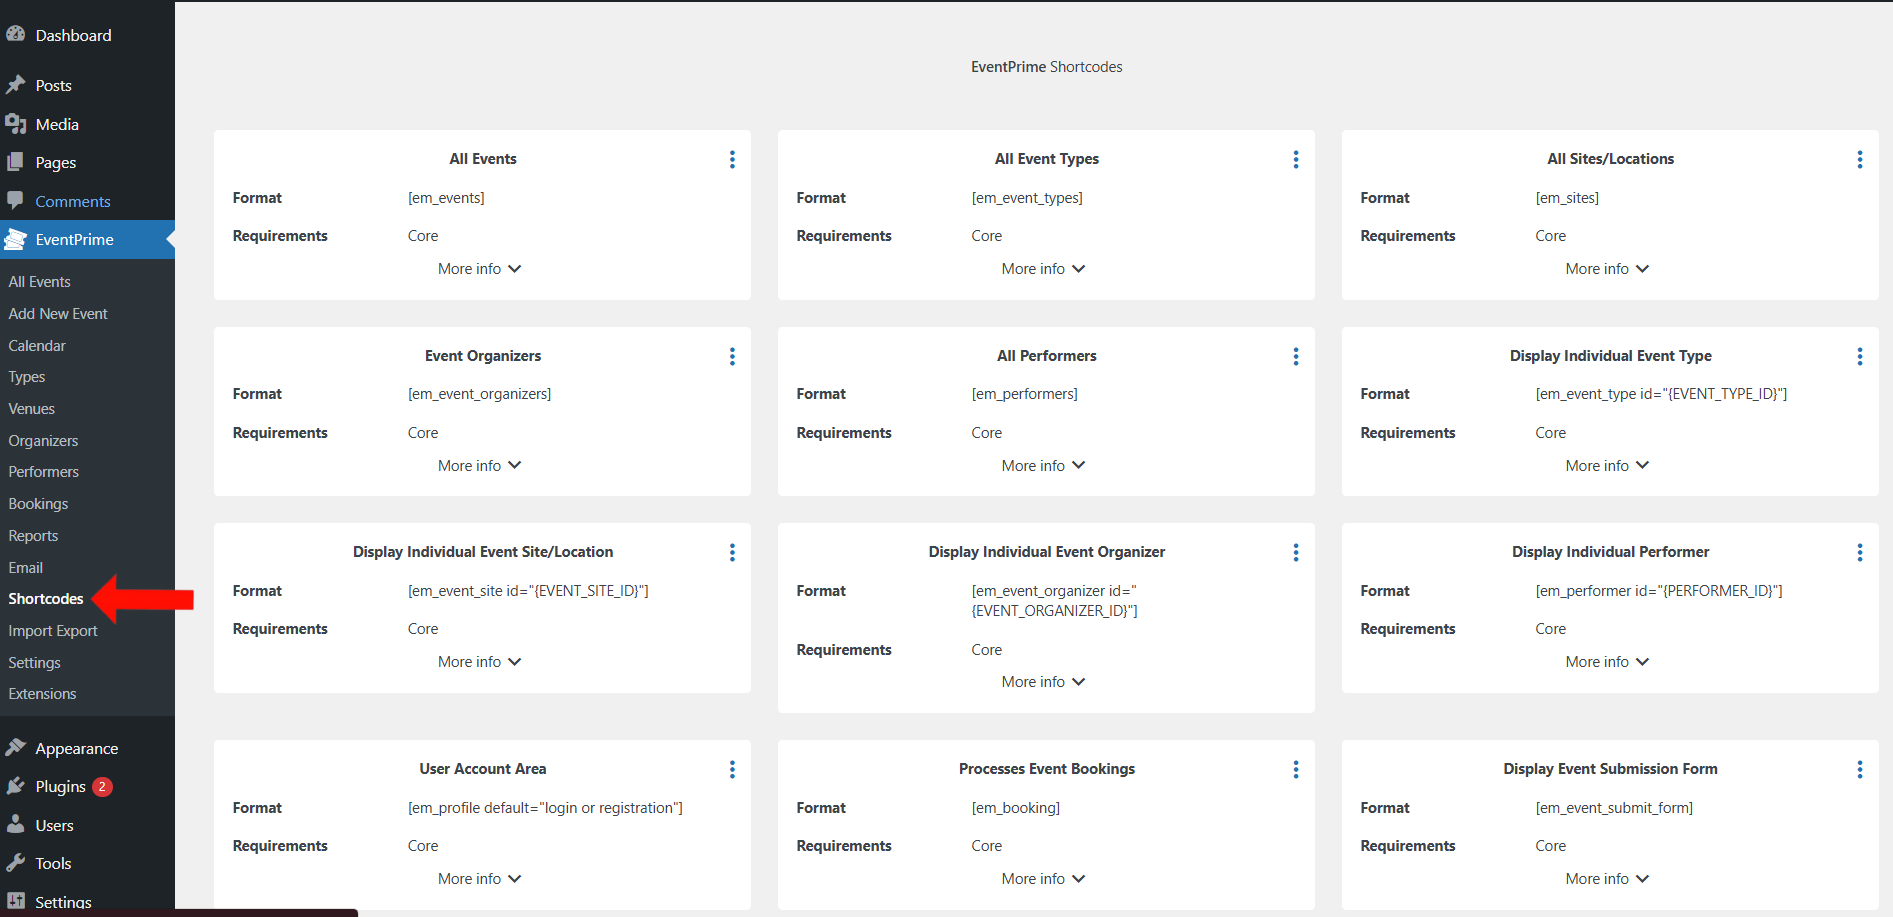
Available EventPrime Shortcodes
Here is a list of the shortcodes provided by EventPrime to build your frontend Event system:
1. [em_events] – Display All Events
- Description: Renders the main Events display on the frontend. This is the primary shortcode for showing Events. Users can navigate to related pages such as Event Types, Venues, and Performers from here.
- Example:
[em_events view="month" types="1,2" sites="3" show="10" upcoming="1" disable_filter="0" filter_elements="date_range,event_type" individual_events="this month" order="asc"] - Attributes:
view: Sets the display style. Options:square_grid,staggered_grid,rows,slider,month,week,listweek,day.id: Display a specific Event by its ID. Usingidandviewtogether shows the event in the specified view; usingidalone directs to the Event detail page.types: Filter Events by specific Event Type IDs (comma-separated).sites: Filter Events by specific Venue/Site IDs (comma-separated).show: Limits the number of Events displayed forsquare_grid,staggered_grid, androwsviews.upcoming: Set to1to show only upcoming Events,0to show all (including past).disable_filter: Set to1to hide the filter options,0to show them.filter_elements: Specify which filters to display (comma-separated). Options:quick_search,date_range,event_type,venue,performer,organizer.individual_events: Show Events based on a relative time frame. Options:yesterday,today,tomorrow,this month.order: Sort Events. Options:asc(ascending),desc(descending).
2. [em_event_types] – Display All Event Types
- Description: Shows a directory of all created Event Types. Clicking an Event Type leads to a page listing all Events under that type.
- Example:
[em_event_types display_style="grid" limit="12" cols="3" load_more="1" search="1" featured="0" popular="1"] - Attributes:
display_style: How to display the types. Options:grid,colored_grid,rows.limit: The maximum number of Event Types to show initially.cols: Number of columns for grid layouts.load_more: Set to1to enable a ‘Load More’ button,0to disable.search: Set to1to show a search bar,0to hide.featured: Set to1to display only featured Event Types,0for all.popular: Set to1to display popular Event Types,0for all.
3. [em_sites] – Display All Venues/Locations
- Description: Displays a directory of all Event Venues (Sites/Locations). Clicking a Venue shows its details page with a list of Events held there.
- Example:
[em_sites display_style="rows" limit="10" load_more="1" search="1"] - Attributes:
display_style: How to display the Venues. Options:grid,colored_grid,rows.limit: The maximum number of Venues to show initially.cols: Number of columns for grid layouts.load_more: Set to1to enable a ‘Load More’ button,0to disable.search: Set to1to show a search bar,0to hide.featured: Set to1to display only featured Venues,0for all.popular: Set to1to display popular Venues,0for all.
4. [em_event_organizers] – Display Event Organizers
- Description: Shows a directory of all Event Organizers. Clicking an Organizer leads to their page listing associated Events.
- Example:
[em_event_organizers display_style="colored_grid" limit="8" cols="4" load_more="0" search="1"] - Attributes:
display_style: How to display the Organizers. Options:grid,colored_grid,rows.limit: The maximum number of Organizers to show initially.cols: Number of columns for grid layouts.load_more: Set to1to enable a ‘Load More’ button,0to disable.search: Set to1to show a search bar,0to hide.featured: Set to1to display only featured Organizers,0for all.popular: Set to1to display popular Organizers,0for all.
5. [em_performers] – Display All Performers
- Description: Displays a directory of all Performers. Clicking a Performer shows their profile page with a list of Events they are part of.
- Example:
[em_performers orderby="title" display_style="grid" limit="15" cols="5" load_more="1"] - Attributes:
orderby: How to sort the Performers. Options:title,date,rand.display_style: How to display the Performers. Options:grid,colored_grid,rows.limit: The maximum number of Performers to show initially.cols: Number of columns for grid layouts.load_more: Set to1to enable a ‘Load More’ button,0to disable.search: Set to1to show a search bar,0to hide.featured: Set to1to display only featured Performers,0for all.popular: Set to1to display popular Performers,0for all.
6. [em_event_type] – Display Individual Event Type Details
- Description: Shows the details and associated Events for a single, specific Event Type. Requires the Event Type ID.
- Example:
[em_event_type id="5" event_style="rows" event_limit="5" load_more="1" hide_past_events="1"] - Attributes:
id: (Required) The ID of the Event Type to display.event_style: How to list the associated Events. Options:grid,rows,plain_list.event_limit: Maximum number of Events to show.event_cols: Number of columns for thegridEvent style.load_more: Set to1to add a ‘Load More’ button for Events,0to disable.hide_past_events: Set to1to hide past Events associated with this type,0to show all.
7. [em_event_site] – Display Individual Venue/Location Details
- Description: Shows the details and associated Events for a single, specific Venue (Site/Location). Requires the Venue ID.
- Example:
[em_event_site id="12" event_style="grid" event_limit="6" event_cols="3" hide_past_events="0"] - Attributes:
id: (Required) The ID of the Venue (Site) to display.event_style: How to list the associated Events. Options:grid,rows,plain_list.event_limit: Maximum number of Events to show.event_cols: Number of columns for thegridEvent style.load_more: Set to1to add a ‘Load More’ button for Events,0to disable.hide_past_events: Set to1to hide past Events at this Venue,0to show all.
8. [em_event_organizer] – Display Individual Event Organizer Details
- Description: Shows the details and associated Events for a single, specific Event Organizer. Requires the Organizer ID.
- Example:
[em_event_organizer id="3" event_style="plain_list" event_limit="10" load_more="0" hide_past_events="1"] - Attributes:
id: (Required) The ID of the Event Organizer to display.event_style: How to list the associated Events. Options:grid,rows,plain_list.event_limit: Maximum number of Events to show.event_cols: Number of columns for thegridEvent style.load_more: Set to1to add a ‘Load More’ button for Events,0to disable.hide_past_events: Set to1to hide past Events by this Organizer,0to show all.
9. [em_performer] – Display Individual Performer Details
- Description: Shows the details and associated Events for a single, specific Performer. Requires the Performer ID.
- Example:
[em_performer id="7" event_style="rows" event_limit="8" load_more="1" hide_past_event="1"] - Attributes:
id: (Required) The ID of the Performer to display.event_style: How to list the associated Events. Options:grid,rows,plain_list.event_limit: Maximum number of Events to show.event_cols: Number of columns for thegridEvent style.load_more: Set to1to add a ‘Load More’ button for Events,0to disable.hide_past_event: Set to1to hide past Events featuring this Performer,0to show all. (Note: Parameter name seems inconsistent in original data, likely should behide_past_events)
10. [em_profile] – User Account Area
- Description: Displays the user profile area. Logged-in users can view their Bookings and manage their profile. Logged-out users see login/registration forms.
- Example:
[em_profile default="login"] - Attributes:
default: Determines the view for logged-out users. Options:login,registration.
11. [em_booking] – Process Event Bookings
- Description: This shortcode is essential for the Booking process. Add it to the page designated to handle Event Bookings. EventPrime usually sets this up automatically.
- Example:
[em_booking] - Attributes: None.
12. [em_event_submit_form] – Frontend Event Submission Form
- Description: Displays a form on the frontend allowing users (typically logged-in, depending on settings) to submit their own Events.
- Example:
[em_event_submit_form] - Attributes: None.
13. [em_booking_details] – Display Booking Details
- Description: Use this shortcode on the page where users should be directed to view the details of a specific Booking they have made.
- Example:
[em_booking_details] - Attributes: None.
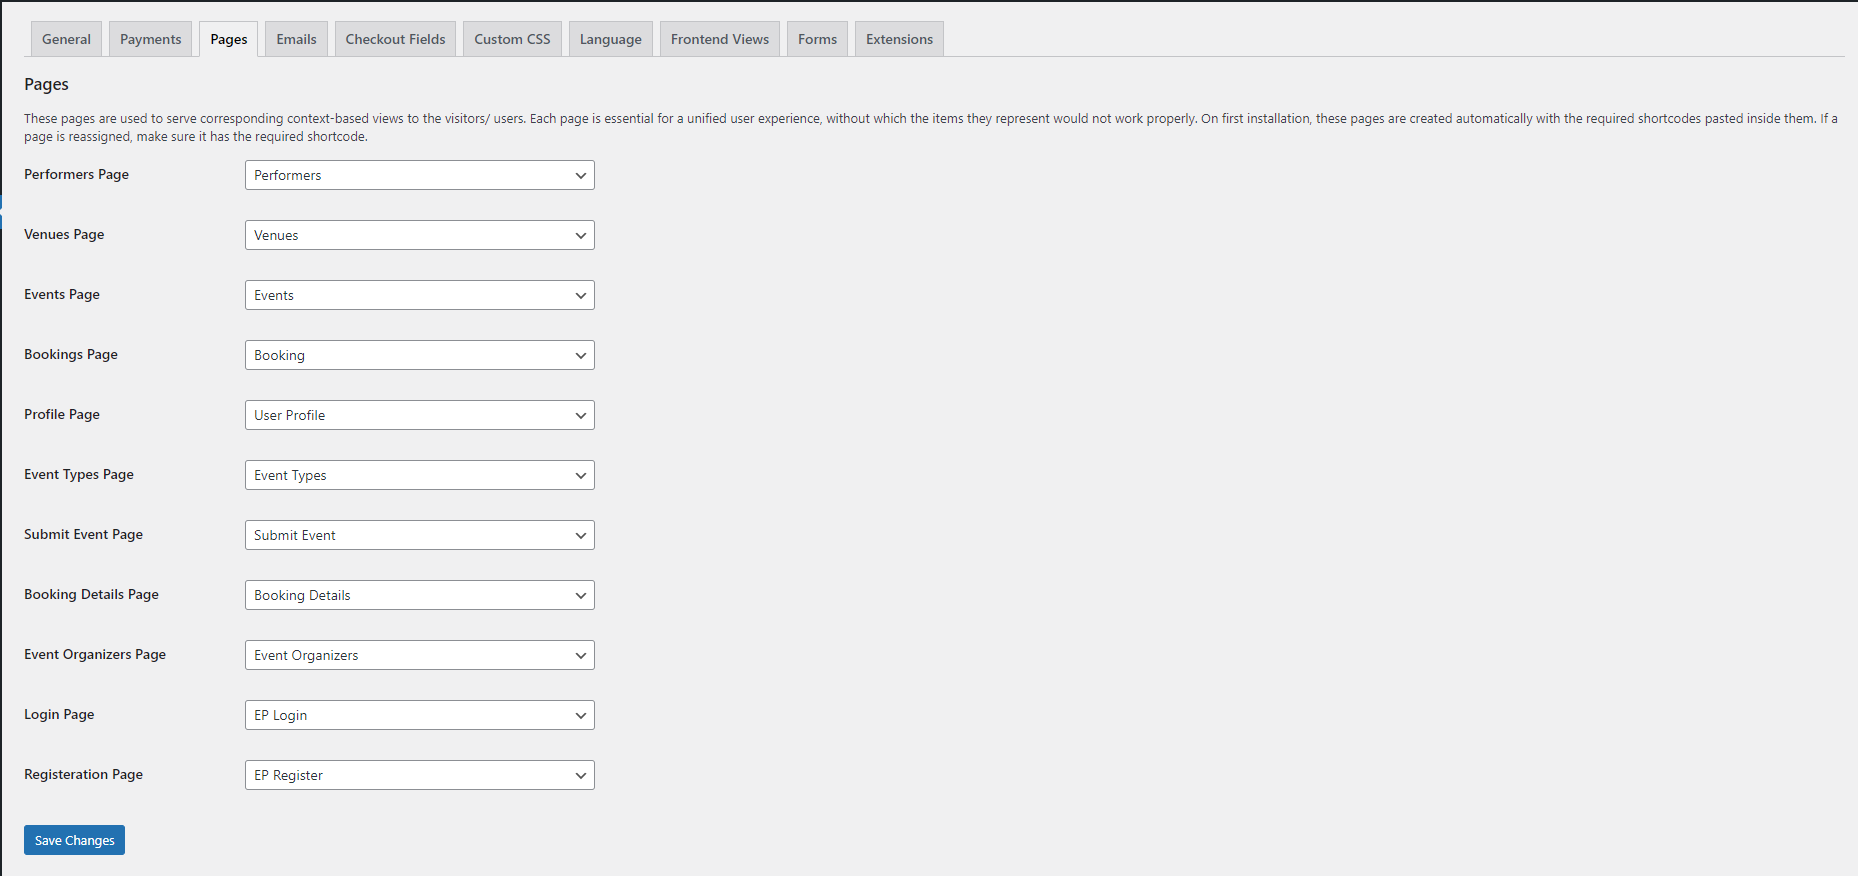
Managing EventPrime Pages
EventPrime automatically creates and assigns pages for core functionalities such as the main Events page, Event Types, Venues, Performers, and the user profile. It links these pages together seamlessly (e.g., clicking a Performer on the Event page links to the corresponding Performer page).
If you prefer to use your own custom pages where you’ve manually added the shortcodes, you can easily reassign these default pages:
- Go to EventPrime -> Settings.
- Click on the Pages tab.
- Use the dropdown menus for each page type (Events Page, Event Types Page, Performers Page, etc.) to select the page where you have placed the corresponding shortcode.
- Click on Save Changes.
Conclusion
EventPrime’s shortcodes offer a powerful and flexible way to display and manage Events across your WordPress site. By placing the appropriate shortcode on any page, you can create dynamic sections for Events, Venues, Performers, Organizers, and more—no custom coding required.
Questions, Support & Custom Solutions
- Need more details or can't find what you're looking for? Let us know how we can help! Contact our support team here.
- Looking for a tailor-made solution to meet your specific needs? Our dedicated customization team is here to help! Use this link to share your requirements with us, and we'll collaborate with you to bring your vision to life.
Is it possible to have the default calendar view as a grid view of events?
Thanks for reaching out to us.
To achieve this please follow the steps
If you have any further questions, please don’t hesitate to reach out to us.
This feature is not working. I have tried it multiple times and actually thought my installation is broken.
I tried removing all available view and retaining only “square grid view”, and selected it as the default view but it still didn’t work.
To ensure that the “Square Grid View” displays correctly on your website, please follow these steps:
If the issue persists, we recommend contacting our support team directly for further assistance. We are always happy to help. You can reach our official support through the following support contact link: https://theeventprime.com/support/.
I have removed all Views except Square Grid AND selected it in the dropdown. My website still defaults to a calendar view. Thanks for your help!
Thank you for bringing this to our attention.
We understand that this issue might be due to some local environment conflict. We tried replicating the problem under various test conditions but found the functionality to be operational on our end. To further assist you, we recommend deactivating any additional plugins and retesting the system.
If the issue persists, Please contact to our support team directly for further assistance. We are always happy to help. You can reach our official support through the following support contact link: https://theeventprime.com/support/.
We are displaying our calendar as a weekly agenda. Is it possible to NOT show the different event types at the bottom of the event listings?
Thanks for using EventPrime!
To achieve the desired result, please navigate to the “Events -> Settings” sub-menu select the “Custom CSS” tab, and place the below-mentioned CSS in the TextArea and save changes.
.emagic #ep-events-container .ep-event-types {

    display: none;

}
If you have any further questions, please don’t hesitate to reach out to us.
Awesome! Thanks so much
How can I get rid of the search bar/section at top of the calendar view?
Thank you for your question! To remove the search bar or section at the top of the calendar view, you can use the shortcode [em_events disable_filter=”1″].
For more information on additional shortcodes, please visit EventPrime -> Shortcodes.
If you have any further questions, please don’t hesitate to reach out to us.
I set up in pages, direct integration of the calendar to the page, checked the shortcode, everything is set up correctly. However, despite this, on the page where the calendar should be displayed, it just shows an animation that the calendar is loading, but the calendar does not load for some reason.
To address the issue you’re experiencing with the calendar not loading, we recommend updating EventPrime to the latest version (4.0.4.8). After updating, please check if the issue has been resolved.
If the issue persists, Please contact to our support team directly for further assistance. We are always happy to help. You can reach our official support through the following support contact link: https://theeventprime.com/support/.
I have the “Attendee Names Required” option UNCHECKED in settings and yet checkout is still requiring users to set a name for every ticket.
btw, I got the events listing fixed by clearing my WordPress cache.
Thanks for reaching out to us.
You can hide the attendee name fields at checkout using custom CSS. You may add custom CSS by navigating to the “Events -> Settings” sub-menu select the “Custom CSS” tab.
If you have any further questions, please don’t hesitate to reach out to us.
Hello,
is it possible to use different views of the [em_events]?
For example on one page I use the “stacked rows” view and on another site I use the “calandar / month” view of all passed and upcoming events.
Thanks in advance.
Konny
Thanks for reaching out to us.
Yes, you may display different views of the [em_events] shortcode on separate pages within a single site. For example, you can use the “stacked rows” view on one page and the “calendar/month” view on another to display your events as needed.
If you wish to use these views on multiple sites, please note that a multi-site license is required to enable this feature across various sites.
If you have any further questions, please don’t hesitate to reach out to us.
Thank you very much for your fast help!
Is it also possible to show past events on one page (e.g. in the calendar view) and hide them on the other page (e.g. in the stacked rows view)?
In the settings (Frontend Views – Event List) I only found the switch “Hide Past Events from Event Lists”. Depending on its status, the past events are then either switched on or off on both pages.
Tanks in advance
Hello,
You can utilize the following shortcodes on different pages to display event listings as per your requirement:-
[em_events upcoming=”0″] – To display past events.
[em_events upcoming=”1″] – To display future/upcoming events.
Shortcode attributes take priority over the global settings.
Please note, to adjust the layout you may include the “view” attribute.
More information on the shortcodes and their attributes can be found under the “EventPrime > Shortcodes” sub-menu.
If you require further assistance, feel free to contact us.
We have an issue, We are using:
– WordPress version: 6.7
– EventPrime – Modern Events Calendar, Bookings and Tickets Version 4.0.5.2 | By – EventPrime Event Calendar (Free Version)
– Salient Theme Version 17.0.4
I put the Three shortcodes below in the tabs element to display on 1 website page:
Tab 1: [em_events types=”76″]
Tab 2: [em_events types=”77″]
Tab 3: [em_events types=”78″]
on Event Prime > Settings > Frontend Views > Event Listings > Default View > Slider
On the front end when we see the page everything is fine, there is only an issue in tab 1 we can’t click the arrow in the left and right side of the slide to see the next event or previous event.
If we click on Tab 2 everything is fine we can click the arrow in the left and right side of the slide to see the next event or previous event.
How to solve it?
We want it to be like https://demo.theeventprime.com/events/ click slide. only later there will be 3 tabs each tab has a different event type, all in slide view
Thank you for writing to us!
At present, only one instance of the [em_events] shortcode can be used per page. However, we’re pleased to share that expanding this capability to multiple instances exists in our pipeline and will be introduced in one of our upcoming releases.
If you have any further questions, please don’t hesitate to reach out.
We are always here to assist!
Can you help? I can display my events using:
[em_events view=”square_grid” em_events types=”20″]
And it displays great.
However, each organizer runs several different events and on their individual page I only want their events to be shown. I can’t work out how to do this? I want to show them as square_grid. I can’t select them by event type as other organizers are also using that event type. Can you help?
Thank you for reaching out.
You can display events for a specific organizer using the following shortcode:[em_event_organizer id=”{EVENT_ORGANIZER_ID}” event_style=”grid/rows/plain_list” event_limit=”{NUMBER}” event_cols=”{NUMBER}” load_more=”0 or 1″ hide_past_events=”0 or 1″]
This will display the organizer’s details along with a list of their associated events.
If you have any further questions, please don’t hesitate to reach out to us.
Hey, but what if I want to share just events from organizer BUT I don;t want to see info about organizer. Can I hide it with shortcake? Thank
Thanks for reaching out to us.
To assist you further could you please share the page URL where you want to remove organizers info?
Hi, I have the following issue. The Month-Calender-View on my desktop version is perfect, but for the mobile version its to big to see any dates. I used [em_events].
On my website I have the possibility to put two different types of codes (for mobile und desktop).
What shortcode do I need to put in the mobile version, when I want to display the “Calendar/Week-Agenda” and what shortcode I have to put on the desktop version to have the “Calendar Month” version. Thanks in advance.
Thanks for reaching out to us.
Currently, multiple shortcodes on a single page are not supported. We recommend using one shortcode per page.
If you have any further questions, please don’t hesitate to reach out to us.
Where are the shortcode attributes documented? I see the examples under “Shortcodes” in the WPress menu, but that doesn’t explain them or show all the options.
Thanks for reaching out to us.
To assist you further could you please let us know which shortcode you’re using and what you’re trying to achieve?
For more information please visit the following link: https://theeventprime.com/wordpress-event-calendar-shortcodes-by-eventprime/
If you have any further questions, please don’t hesitate to reach out to us.
Let us know if you need any more details—we’re happy to help!
I want to understand the attributes for ALL shortcodes. Neither the referenced page (current page) nor examples provided explain the options thoroughly (i.e. [em_events view=”square_grid/staggered_grid/rows/slider /month/week/listweek/day” id=”{EVENT_ID}” types=”1,2,…” sites=”1,2,…” show=”5″ upcoming=”0 or 1″ disable_filter=”0 or 1″ filter_elements=”quick_search,date_range,event_type,venue,performer,organizer” individual_events=”yesterday or today or tomorrow or this month” order=”asc/desc” ])
A couple of specific questions I would have are
1) Where do I obtain the EVENT_ID?
2) How would I display events just for August, for example?
Hello,
We are pleased to share that a comprehensive documentation for shortcodes will be published soon.
Regarding your queries:
1) The EVENT_ID corresponds to the event’s post ID, which can be found in the URL of the ‘Edit Event’ page or by hovering over the respective event.
For instance, if the URL for the ‘Edit Event’ page is https://your-domain.com/wp-admin/post.php?post=21&action=edit, the EVENT_ID would be 21.
2) Currently, filtering events by a specific month is unavailable. However, we have noted your request and will conduct a feasibility analysis for potential implementation. Upon deployment, it will be highlighted in the plugin ORG’s changelog.
I’m using the [em-events] shortcode to output the upcoming events and i notice that the even description is stripped of any formatting (bullet points, etc.). Is there a way to preserve the original description, as added during the event creation, with the shortcodes?
Hi,
Thank you for reaching out!
Our team has taken note of it and the resolution will be deployed soon with our upcoming release.
Hi, I am trying to display a calendar that only shows events of a specific type and am using the short code [em_events type=”210″], but it is showing events with other types. If I use [em_events types=”210″] it shows no events.
Also, if I click on an event in the calendar to see more information, it returns a page not found message.
Hi Rob,
Thank you for reaching out!
In the shared shortcode [em_events types=”210″], it appears that the quotation marks around the event type IDs may not be correctly formatted.
Could you please manually update the shortcode to
[em_events types="210"]and test again?Hi,
Thanks for this great plugin.
I’m still exploring its potential for my project and there’s one aspect related to shortcodes that I’d like to ask more info about.
Is there a way to display in the [em_events] shortcode, especially in square grid and staked grid, the name of the venue?
Having multiple venues is a core feature of this plugin and it’d make a lot of sense to display the venue name as well as the event title, etc.
Thank you!
Thank you for your kind words.
Regarding your request, the venue name is currently displayed in all views except the calendar. This is an issue in our latest version, and we will add this fix in our upcoming releases very soon.
Additionally, at present, each event can be assigned to only one venue. However, we understand the value of supporting multiple venues for a single event, and we have forwarded your request to our planning and development team for consideration in future updates.
Please feel free to reach out if you have any further suggestions or questions.
Event images are not loaded by default, showing an empty images block, unless you switch to list or any other view and back to original view. Only then event image is loaded on all cards.
I thought it’s only an issue with the elementor event-prime plugin, but this issue is reproducible when using a shortcode as well:
[em_events view=”square_grid” disable_filter=”0″]
Plugin Version 4.0.9.0
Thank you for bringing this to our attention.
We have tested the issue on our end and the event images appear to be loading as expected in the default view. To assist you further, could you please share the specific steps to reproduce the issue? Additionally, if possible, a link to the page where the issue is occurring.
I am having trouble making Eventprime show up on the website. We are using Event Calendars currently. I am still new to WordPress, so there are some things I can not fully understand enough to do. I also do not want to risk messing up the business website. How do I have eventprime show up on the website and not event calendars?
Thank you for reaching out!
To display EventPrime on your website, you’ll first need to ensure that the plugin is properly installed and activated.
Once EventPrime is active, you can start adding events. For a step-by-step guide, we recommend referring to our official documentation here:
👉 https://theeventprime.com/starter-guide/
If the issue persists, feel free to reach out, we’re happy to assist you.
Hi,
I’m currently using this view
[em_events show=”40″ view=”square_grid” upcoming=”1″ order=”asc” types=’1″]
Square Grid as default (showing fine)
But when i change the View. for example change to Calendar View
it only shows the past events
Can you please help ?
Thank you!
Thank you for reaching out.
To ensure upcoming events are visible in the Calendar View, please navigate to EventPrime → Settings → Frontend Views tab. Under the Event Listings sub-tab, make sure that the option “Hide Upcoming Events” is disabled. This setting, when enabled, hides all upcoming events from the calendar view.
Once this is disabled, your upcoming events should display correctly in the Calendar View.
Let us know if you need further assistance—we’re happy to help!
where i can find the option for changing font size in the calender view ? its too small, everything ?
Thank you for reaching out to us.
You can adjust the font size by following these steps: Go to EventPrime → Settings, then click on the General tab. There, you’ll find an option to set the font size. Adjust it as needed, and the changes will apply across the EventPrime plugin.
If the issue persists or if you need help with specific sections, please feel free to share the URL of the page — we’ll be happy to take a closer look and assist you further.
Hi, I woulid like to display my events using shortcode [em_event_types].
There are three types: courses and lectures and Off campus activities.
Is it possible to display only selected type or exclude type?
Thank you.
Thanks for reaching out to us.
Yes, you can display events based on specific event types using the following shortcode:
[em_events types=”1,2,…”]
Here, the types attribute should include the Event Type IDs (comma-separated) corresponding to the event types you wish to display.
Additionally, if you’d like to show details of a single event type, you can use this shortcode:
[em_event_type id=”{EVENT_TYPE_ID}”]
This will display all the details associated with a particular Event Type.
If you need help finding the Event Type IDs or have any further questions, feel free to reach out — we’re happy to assist!
Hi, the number of characters in ‘square_grid’ can only display 20 characters. could you let me know how to increase the character limit? Thank you.
The 20-character limit in the ‘square_grid’ view can be changed using custom CSS. If you need help with the custom CSS, please contact our support team using the link below:
https://theeventprime.com/support/
They’ll be happy to assist you with the exact code or steps needed.
Let us know if there’s anything else we can help you with!
Hello, is it possible to remove the following tabs on the profile page :
– “My Events” which is not useful to me as I do not plan to allow subscribers to submit events ;
– “My Account” : I use UsersWP to manage user accounts and the “Edit my account” link goes to the WordPress backoffice profile management, which I don’t want.
Or is there a way to modify this link without it being configured by default again each time your plugin is updated ?
Thank you !
Thanks for reaching out to us.
To remove My Events and My Account section, please navigate to the “EventPrime -> Settings” sub-menu select the “Custom CSS” tab, and place the below-mentioned CSS in the TextArea and save changes.
.ep-list-group.ep-myaccount-tabs .ep-list-group-item.ep-tab-item.ep-user-profile-my-event-tab {
display: none;
}
.ep-list-group.ep-myaccount-tabs .ep-list-group-item.ep-tab-item.ep-user-profile-my-account-tab {
display: none;
}
If you have any further questions, please don’t hesitate to reach out to us.
Hi,
We list on-demand events (recordings of webinars) as well as live webinars on our site. The listings for on-demand events display the start date even when we have ‘hide start date’ ticked on the event listing. This gives customers the incorrect impression that the events aren’t available on demand. The date appears on the event page – not such an issue – but also in the calendar view. You can see examples here: https://www.sgaonline.org.au/calendar/
Is there a way to remove or filter out the start date from the calendar view for on demand events only?
Thank you for reaching out to us..
We’ve checked your calendar view at https://www.sgaonline.org.au/calendar/, and it appears that the date and time are already successfully hidden for your on-demand events. Instead, we can see your custom text “On demand – instant access” is being displayed.
If the issue persists please contact to our support team directly for further assistance. We are always happy to help. You can reach our official support through the following support contact link: https://theeventprime.com/support/
Hi,
I’m delighted with your plugin that allows a lot of usefull possibilities.
I currently use the following shortcode to display the list of previous events of a specific type (dealing with thetre plays here).
[em_events view=”list” order=”desc” types=”58″ disable_filter=”1″ filter_elements=”date_range,event_site”]
WOrks perfectly but the row view is a bit to furnished for my specific needs and a much simplier list with only the date the event took place and the venue it was programmed would be more convenient.
I assume such a “simple” view with specific argument “date, venue” is not implemented, but could it be achieved using CSS (or any other way) to deplete the “row” view from the image and the “view details” button ?
Thanks in advance for you reply.
G. Levasseur
My website is underconstruction on localhost, can’t provide URL ;/
Thank you for your kind words — we’re delighted to know you’re enjoying EventPrime and finding it useful!
To display your past events in the Row View, please use the following shortcode:
[em_events view=”rows” types=”58″ upcoming=”0″ disable_filter=”1″ order=”desc” ]
You can explore more shortcodes by going to EventPrime -> Shortcodes on wordpress dashboard
If you have any further questions, please don’t hesitate to reach out to us.
How can we limit the number of slider events to less than 10?
Hi Jonathan,
Thanks for reaching out to us.
Currently, the option to limit the number of events is available for Square Grid and other listing views, where you can control the event count and use the Load More functionality.
However, for the Slider view, the number of events displayed is managed automatically based on the slider configuration and does not have a dedicated setting to limit the event count (for example, to fewer than 10 events).
If you still have any further questions regarding this, feel free to reach to us on our support here: https://theeventprime.com/support/
Hi,
I use the following shortcode to show 3 upcoming events [em_events show=”3″ upcoming=”1″]. Since I use the WPBakery Page Builder as a PageBuilder I would like to use this for the events. This also works very well for the events.
However, I have a problem with the preview of the events with the above shortcode. Here, the shortcodes of the WPBakery Builder are not resolved.
Is there a possibility to resolve the shortcodes after or before the em_events shortcode?
Thanks and BR
Thomas
Thank you for reaching out and for explaining the scenario in detail.
Could you please publish the page and check it on the front end? Once published, all shortcodes should render correctly as expected.
Please let us know if the issue persists after publishing, and we’ll be happy to assist further.