
Overview
The Event Tickets extension in EventPrime lets you design tickets for your Events. You can choose colors, fonts, borders, and icons based on your requirement—making your tickets more personalized for attendees.
Prerequisite
Please ensure that EventPrime and the Event Tickets extension are installed and activated on your WordPress site.
If you haven’t installed the extension yet, get it from here: Get Your Event Tickets Extension
Steps to Create and Customize Event Tickets in EventPrime
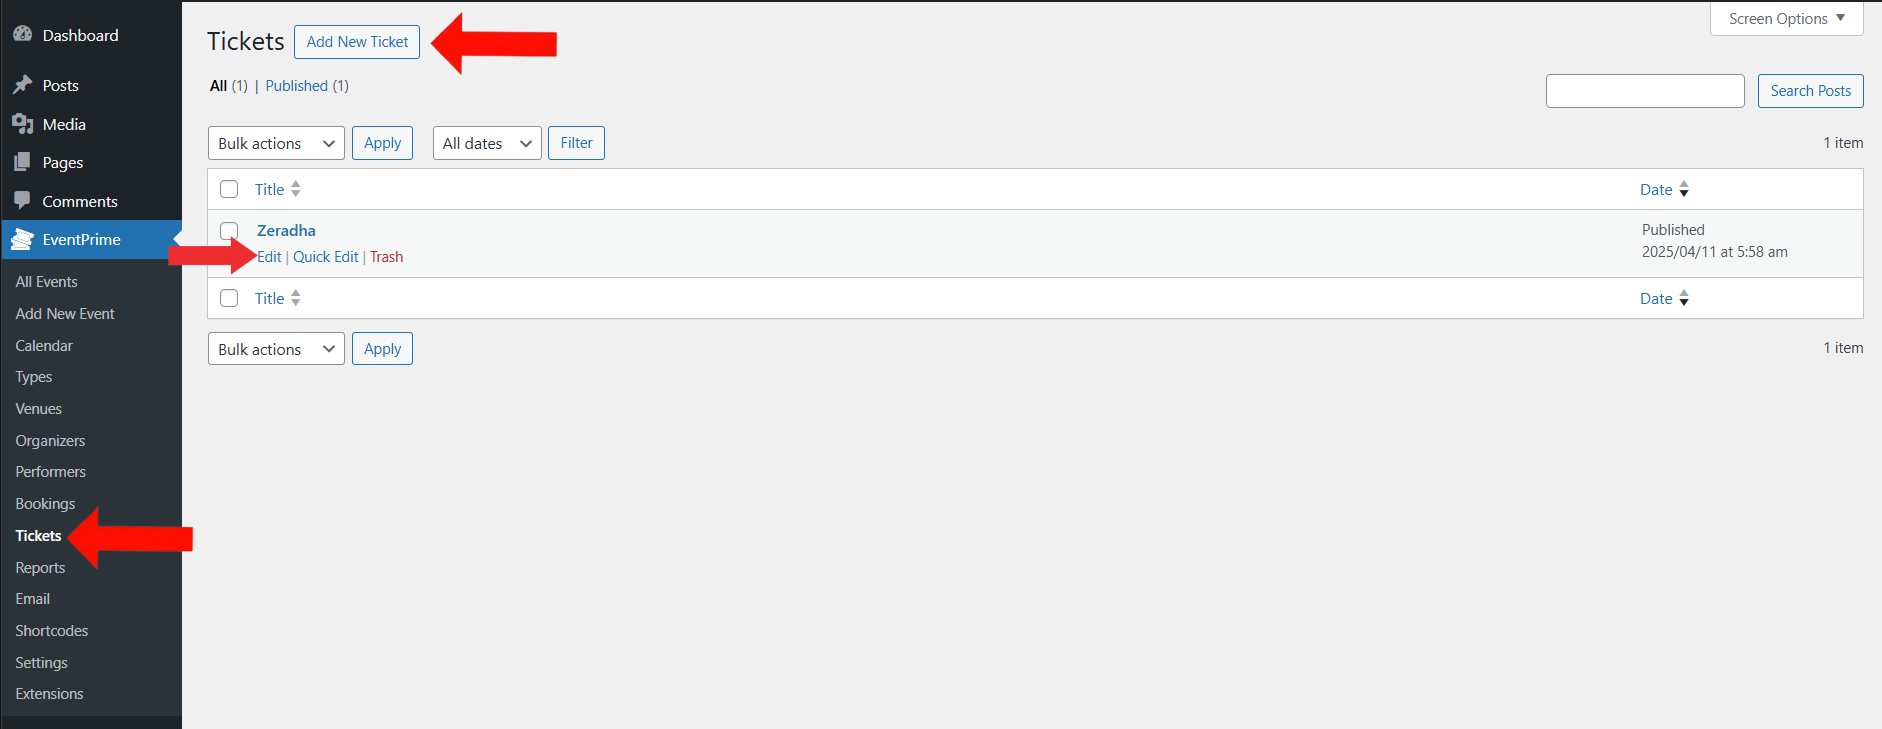
1. Create a New Ticket or Edit One to Start Customizing Its Design
Navigate to EventPrime menu, and select Tickets submenu.
On the Tickets submenu, you can manage all your ticket templates. To start:
- Click the Add New Ticket button to create a ticket template. If you haven’t yet created a ticket type to assign this ticket template to, refer to this article: How to Create Ticket Types for WordPress Events
- Alternatively, to modify an existing ticket, click the Edit button to update its design.
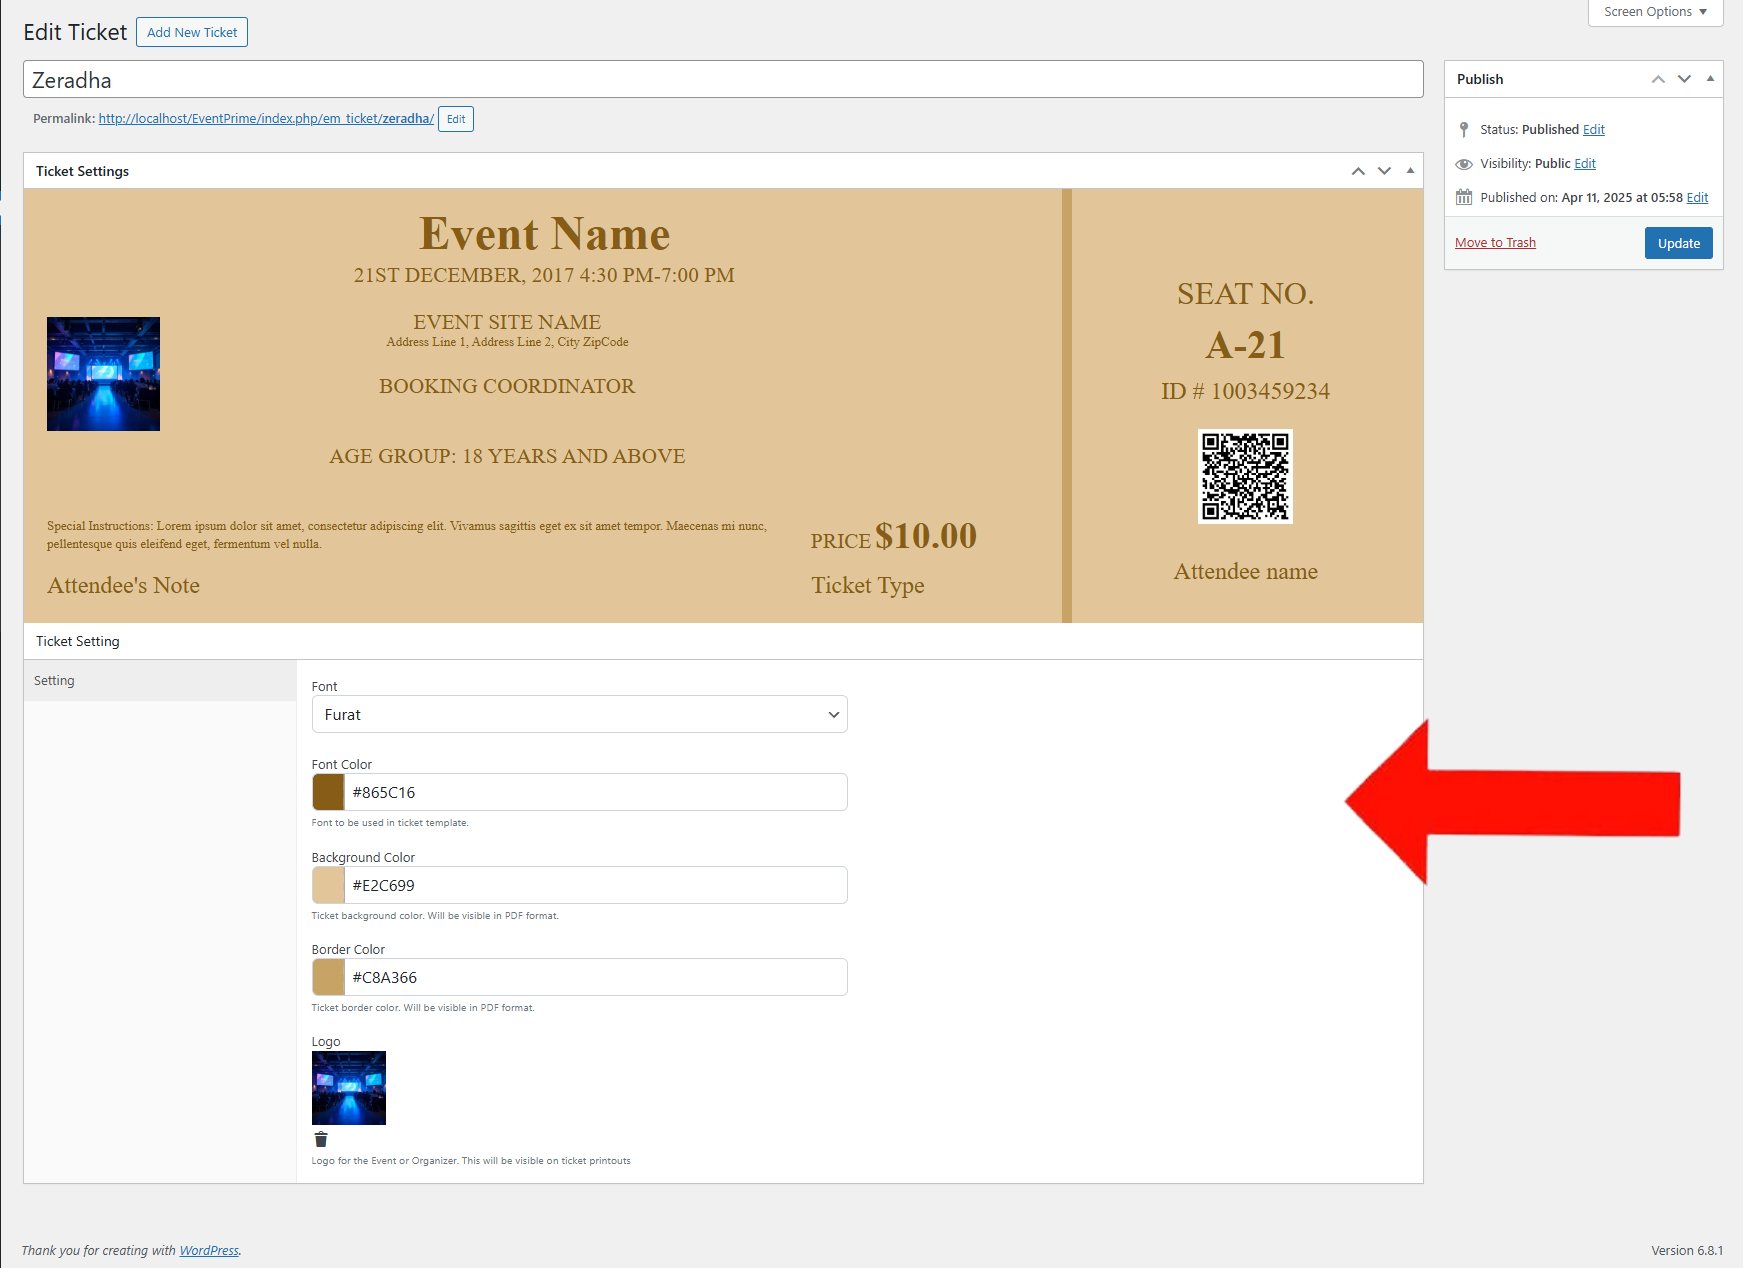
2. Customize the Design of the Ticket Template
On the Edit Ticket page, go to the ticket settings area. Here, you can customize the look and design of the ticket:
- Font: Choose from available options like Furat, DejaVu Sans, FreeSerif, Helvetica, and Times.
- Font Color: Pick a font color that suits your Event theme.
- Background Color: Select a background color for your ticket.
- Border Color: Choose a color for the border of your ticket.
- Upload Icon: Upload an icon to be displayed on the ticket.
After finalizing your design for ticket template, click the Update button to save the ticket template.
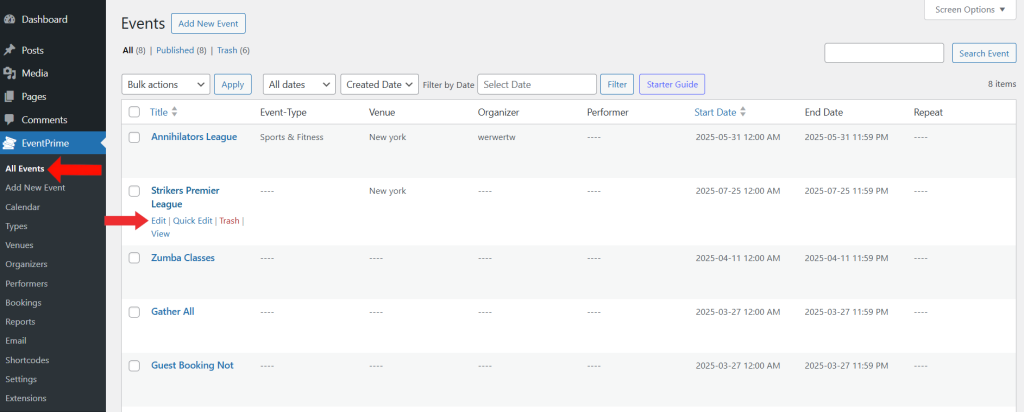
3. Select the Event Where You Want to Use the Ticket Template
- Navigate to the EventPrime menu and select the All Events submenu.
- In the list of Events, click the Edit button for the Event where you want to assign a ticket template.
4. Edit the Ticket Where You Want to Use Ticket Template
- On the Edit Event page, go to the Event Settings and select Tickets tab.
- Click the Edit button for the ticket where you want to assign a ticket template.
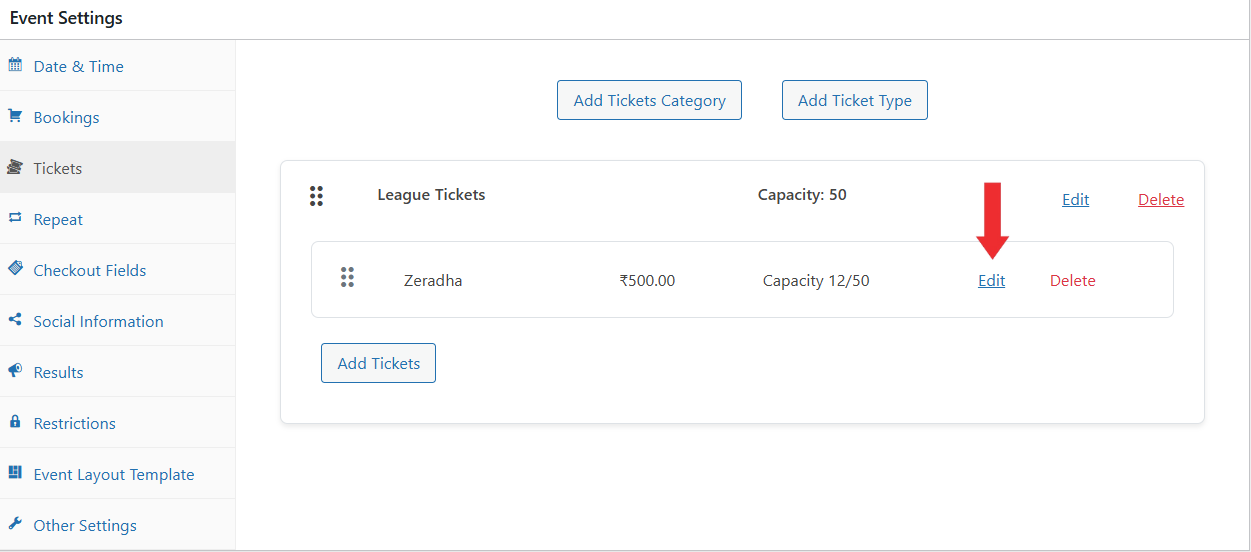
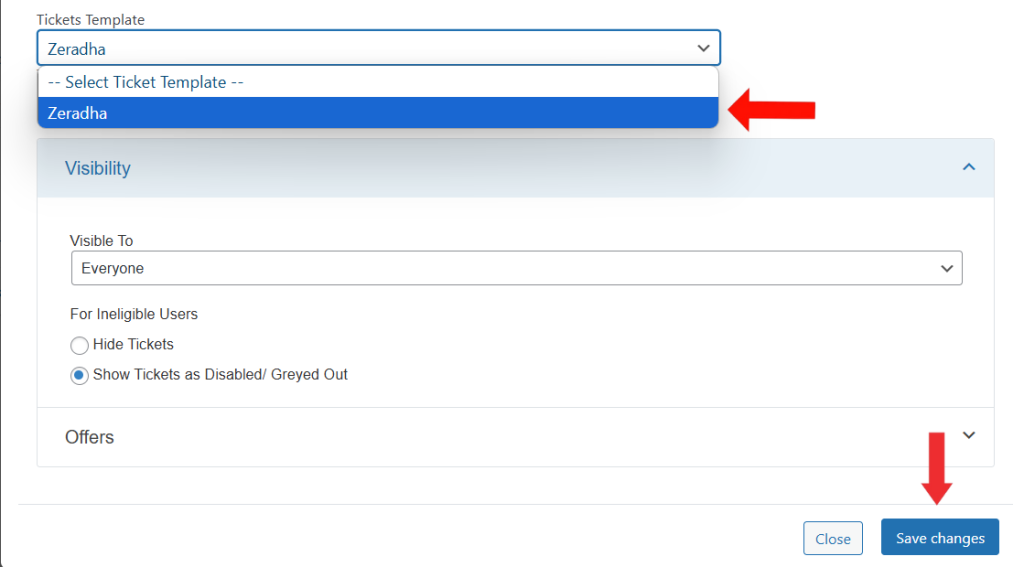
5. Apply the Ticket Template to the Ticket Type
- On the Edit Ticket screen, scroll down to the Ticket Template dropdown.
- Choose the template you previously created.
- Click Save Changes to apply the template to the selected ticket type.
- Then, click Update on the Event to apply this setting.
Frontend View
After completing the checkout process, attendees will receive their Event ticket via email. The ticket is delivered in a PDF format and includes all Event details such as Event name, date, time, venue, price, and ticket ID.
The ticket layout reflects the customized design you’ve created—featuring your selected fonts, colors, icons, and overall style.

Conclusion
The Event Tickets extension in EventPrime lets you create ticket templates that match the look and feel of your event. You can easily choose fonts, colors, and images to personalize your tickets.
It’s a simple way to enhance the attendee experience and keep your event well-organized.
Questions, Support & Custom Solutions
- Need more details or can't find what you're looking for? Let us know how we can help! Contact our support team here.
- Looking for a tailor-made solution to meet your specific needs? Our dedicated customization team is here to help! Use this link to share your requirements with us, and we'll collaborate with you to bring your vision to life.
I am looking for a ticketing solution for a new theater. I am interested in your product, but I need more information. Is it possible to print a QR code corresponding to the ticket number on the ticket? Is there software available to check attendees’ tickets to ensure that purchased tickets are not used more than once? If so, can it be downloaded onto inspectors’ phones?
Thanks for using EventPrime. I hope you are having a wonderful day!
Yes, our event ticket extension includes the functionality of QR code attached to the ticket which is sent with the booking confirmation mail can be scanned with ease through any application available on the IOS app store or GooglePlay store.
The unique QR code is equipped with the booking details page URL, meaning, upon successful scanning of the QR code you will be provided with the respective booking URL which the Admin can visit, and verify the booking.
For more information please visit the following link: https://theeventprime.com/all-extensions/event-tickets/
If you need any further clarification, please don’t hesitate to reach out to us.
Always happy to help!
Please Help. The ticket that my customers receive does not have their seat numbers,
How do I activate to display the seat numbers on their tickets?
Thank you for bringing this to our attention.
We are aware of the issue with seat numbers not being displayed on the tickets. Our team is actively working on this, and the fix will be included in our upcoming release, version 4.0.8.0.
If you have any further questions, please don’t hesitate to reach out to us.
How can I remove tickets from my cart that I regret? I wanted to use the woocommerce checkout hooks to allow me to work with the cart on the checkout screen. But the events are not products… with your integration it doesn’t work. What should I do?
Hi,
The WooCommerce Checkout extension is currently configured to redirect users directly to the checkout page after selecting event tickets, bypassing the cart. To modify a purchase, users must restart the booking process.
We’ve noted this workflow and will assess possible refinements for enchanced flexibility.
How do I re-send confirmed booking emails for attendees that lost their confirmation email?
Thanks for reaching out to us.
Attendees can easily access and download their tickets by going on User Profile page on the frontend. From there, they should navigate to the “My Bookings” section, click on “Details” next to the relevant event, and download their ticket.
If you have any further questions, please don’t hesitate to reach out to us.
Thank you, but I am looking for a method for admin to resend/reprint tickets
You can resend booking confirmation email with tickets from the admin panel by following these steps:
Go to EventPrime → Bookings in your WordPress dashboard.
Click on the booking you want to resend the ticket for.
Under Booking Status, click the Edit link.
From the dropdown, select the same status (e.g., Completed) and then click Update.
→ This will trigger EventPrime to resend the booking confirmation email.
Good afternoon,
I am curious what fees are associated with the tickets when purchased? Alongside the processing fee for Stripe, what other charges would we incur?
Thanks for reaching out to us.
We provide flexibility to create multiple tickets with different prices as per your needs. Additionally, if you wish, you may add extra fees such as tax or service charges.
Event-level fee (e.g., tax or service charge):
Go to the single event page → Event Settings metabox → Bookings section.
There, you can add a one-time event fee, which will automatically be included in the total ticket price during checkout.
Per-ticket fee (e.g., tax per attendee):
On the same Event Settings metabox, edit each ticket and add an additional fee. You can specify the fee label, amount, and save the changes.
If you have any further questions, please don’t hesitate to reach out to us.
I cant view the ticket pdf, the email is working but no ticket is showing even in the user account and when user receive email.
We have tested this at our end, and it’s working as expected at our end. Please temporarily deactivate all other plugins and check.
If the issue continues, please reach out to our official support team here: https://theeventprime.com/support/ and they’ll be happy to assist you further.